Sunday, November 27, 2016

INTERLOCKING 4 PIECE MOLD

When I first got into casting, I spent the 1st few months experimenting before I did Roboid.  One of the experiments was to make a mold that would allow a double pour.

As stated many times, unless absolutely necessary, I hate painting.  So if I can, I will double pour.  Double pour is a term given to using multiple pours of resin, usually tinted to make a cast.

To do this, you have to work from the outside in.  You do the outside detail before you do the main body of the cast.

Im not to sure how to describe this process.  Each piece of the mold needs to hold part of the next piece of the mold it is attached to.  So the parts of the mold need to be interlocking.

This project was my first figure.  Chiron, who ironically has a Canadian history along with a base history of knowledge including medicine.
CHIRON
 
 
Double pours were able to be done in the standard smush molds use for this figure. Colored drops of red resin were dropped into the appropriate places in the mold using a pin.  The parts were then pressurized and allowed to cure.  Then the white resin was added to the mold cavities and everything was pressurized again.  This is the end result.  Below are the parts of the Interlocking 4 pc mold.  By  Interlocking, I mean the mold has both a male and a female alignment pin.
 

In the above picture, the red resin would be laid in the far left and right mold parts.  This will make the red cross.  In the center mold, the mold would be tipped so the red resin can be cured in the divots that will make the red dots in the saddle.  This took 2 applications.  One for each side.  After the red resin has been poured/cured, the white resin can then be poured. 

When doing the initial pour, you must be VERY careful to not overfill the cavity you are filling.
Conversely, once you have cured the initial pour, it is very critical you not flex the mold in any way that could lift these initial pours from the mold.  OTHERWISE...what happens is when you pour the bulk resin, it will get underneath the initial pour.  You will have to scrape away the 2nd pour to uncover the 1st pour.  Unfortunately at the time I didn't realize the importance of "FAIL" pictures. 


And finally...the finished saddle.  After the red was poured/pressurized/cured, the white resin was poured and processes were repeated. 
 
PLEASE...If I have been unclear in anyway or you feel I could make this easier to understand, please send me an email.  I read all mail and strive for user friendly instructions.  Your feedback is highly appreciated.
 
One last thing...when dealing in clear colors and double pouring, colors will change.  if you have a clear red over a blue, it wont look like it.  Double pours I would recommend limiting to solid colors.  But the best results are found during experimenting.  :-)
 

Sunday, November 20, 2016

4 Part Mold

I finally found all the original pictures of the 4 pc mold.  The post is in draft form as it requires a narrative that is taking me hours to word properly.

Expect any day now.

Thursday, November 17, 2016

Smush Mold Finished Casts/Figure

Now the magnets was just to give you ideas.

But I really meant it when I said I AM LAZY.  I'll spend time in other areas if the end result saves me time.  I could have simply cast the Dianaut Body in a hard plastic resin.  But I opted instead to make actual steel pins.  Why?  Seems like a lot more work...no?

Actually, just a few minutes.  The reasons I opted for steel pins is...

 A) As far as I know, no Garage Kit Caster has done these figures with steel pins, so its an identifier.  I can say hey...that's MY work.

B) It saves me work and therefore time.  These are incredibly small.  To try and trim the flashing on those little arm/leg pins is a nightmare.  You actually run the risk of clipping off the pin while trimming it.  With a steel pin, I don't have to worry about it and can run the knife blade along the pin without worry about cutting the pin off.  I can actually trim the flashing nicer and closer.  So it saves me time, saves me from potentially scrapping a part and most importantly...doesn't drive me crazy and get me mad because I have eliminated the point that was most likely to give me grief.  Its easier for me to make the pins than try and trim the pins.

I cast the legs with the original magnets in them.  I can trim away the foot to install the smaller magnets I bought until I can find better fitting magnrts or magnets I can cut into without affecting their field.

Here's the end result.
Cast Body with Steel Pins Inset

Dianaut Assembled Front View

Dianaut Assembled Side View
Now that I know the steel pins work, I need to make more so I can make a bunch of these.  The Yellow was done for visual purposes to contrast with the black.  Chrome paint will ring the chest bump.  Than can be sponged on.  And little magnets will be installed in the feet.

Sunday, November 13, 2016

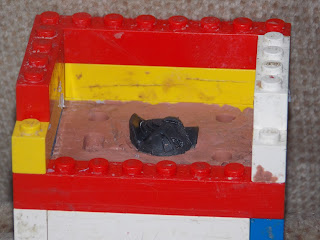
Clay Beds

Like I have said many times...Im lazy.  But I'll spend half an hour, an hour or a day extra f I know its going to save me time in the long run down the road.

I use clay as a bed.  There are different types and hardness.  I just use a simple medium clay.  It needs to be worked.  The warmer it is the easier it is to manipulate.  But its still a pain in the ass.  So I try to save them if I can.  If they haven't been coated once too many times, then I'll re use them as its less time consuming than starting from ground zero.  But eventually the clay gets too covered in sealant and mold release it needs to be thrown out.

The use of LEGO means I can remake the frame to the exact same dimensions.  MEGA BLOCKS (not recommended) deteriorate and never put LEGO through the dishwasher.

Thursday, November 10, 2016

Magnets and Molds...The Purpose

Now in this case with these Dianauts, where I am using magnets...there will be a little divot in the mold to actually hold the pin.  But being a smush mold it will be subject to movement before I close it, so every little bit helps.

More importantly, the magnet was used to stimulate your thinking beyond the box into how you can use silicone molds to your advantage.  How you can use magnets or anything else to help you create the mold. 

There are no set rules to making silicone molds.  You are only limited by your imagination.  For another example check out the 4 piece mold I made years back so I could double pour.

EDITORS NOTE:  I just noticed my post on the 4 pc mold focuses on the result not the mold.  I'll be expanding on it with mold pics.  Im sorry.

Sunday, November 6, 2016

Magnets and Molds

Im trying an experiment.  If it fails, no harm done.  I can still use the mold.

In industry, you never have a pin and a hole made of the same material.  If they jam, they will basically weld themselves together.  One is usually a milder or softer material meant to be replaced with wear.

In particular is the Diaclone Pilots.  They have metal pins for the which the arms/legs to hitch onto.  It lessens the wear.  I was considering only making half the mold and then putting in the pin by hand and then pouring the second half and thought that left too much room for error.  Plus I want the resin to 100% cure around the pins I make for this.

So Im trying to see if I can use magnets to hold the pins in place when I pour the resin.  I simply laid the magnets on top of the bed.  This way except for one face, the entire magnet field is held in the silicone.
If it doesn't work, I can simply remove the magnets and fill in the space with more silicone.
Now to wash it up and pour the silicone and see if it works.  On a personal note...I always make one alignment peg different than the others.  Its easy to get confused when pouring and get your orientation of the mold halves mixed up.


Saturday, November 5, 2016

Where to Put the Mold Split? Smush Molds

Where to put the mold split?  That might seem like a weird question...but we are not doing injection molding so it becomes a very pertinent question. 

You actually have to answer a few other questions.  First you need to determine the orientation. Orientation may also determine what type of mold you want to use.  Today we're going to talk SMUSH molds.  We'll talk about Sprue molds later. 

These are all just my opinions based on my results.  You may not need to do some of the things I do based on what you are casting.

One of the benefits of silicone molds is we can put the mold split where ever we want.  Im lazy.  And I want to do as little sanding as possible.  So when I make a SMUSH mold, I like to "Bury" the master so that 1/2 of the mold is more of a lid.  This then puts the mold split on a corner.  So then if there is any sanding its very little and wont affect the detail.

I also don't like to put a mold split on a peg, or a hole or where a size is critical or concentricity needs to be maintained.  I avoid putting mold splits in those areas.

Here's an example of this.  The Sultan mold for the head. 
 Notice how one half of the mold the one on the left is more of a lid.  The other half (on the right) is more of a cup.  Also the head peg is fully contained.  So any sanding is all along the edges of the cast, the peg is fully concentric and true to the master and we can bend the silicone enough to remove the cast without damaging the mold. 
You need to be sure this peg hole gets resin in it and I like to use a pin to smear it around and make sure the sides are at least coated.  Im being picky, but there is a science behind this.  Things like cohesion and adhesion are simple science concepts but they can wreak havoc on your casts.

Here's another example using the Jade head.  It still needs to be washed before I pour the silicone.  I threw it quickly together for this post.
Notice the mold split is in areas easily sanded with the least effect on detail as well as the fact the peg is completed buried in the clay.  Whatever is clay will be replaced by silicone when we make the second half of the mold. 
 
The next thing is you want hard lines and corners.  You don't want to press the master into the clay.  You want the master to be held tightly in the silicone.  If the clay holds the master too tightly you risk pulling the master out of the silicone before you get a chance to make the second half of the mold.  This can sometimes cause problems.  If the master doesn't seat properly you will get an air pocket and a deformed/thicker cast than you want.
 
This next bed took me a few hours to make. 
 Remember years ago I said my pocket knife was my favorite tool?  Well I use my pocketknife to cut hard clean lines around the master.  This makes for clean edges.  Less flashing and most importantly, less sanding.  I used the tip of the knife to pack clay around and into the corners to give me hard lines.  its easier to do now that try and manipulate cured silicone.  Remember...this is the most crucial part of the mold process.  What you do here determines how much or how little work you will be doing later on.  Here is not the place to take shortcuts.  Take your time.  Do a good job and you'll be rewarded and thankful later on.


Silicone Smush Molds

For garage kit casting I use silicone to make my molds.  This provides some flexibility that we need to make some items as we don't have the same luxury as steel molds with injection molding.

I use smush molds for small HIGH detail parts where a sprue system is impractical.  Another thing, Injection molds are a 50/50 split.  This can be problematic for garage kit casting.  Steel molds don't give.  They have no flashing.  If you have flashing on your cast...your mold gave.  That means your cast is now just a little bit thicker than it should be.  If you are casting 5mm pegs this is now a serious problem as your pin is now bigger than 5mm and most likely out of round.

Silicone provides ways of working around this.  Because silicone does have give...we can make molds using the flexibility of the silicone to help release cast parts.    We can bend the silicone mold to release parts.  Something not possible with steel injection molds.  Hence the 50/50 mold split in injection molding.

Silicone molds are great, fun and easy.  The hardest part, is determining just WHERE to make you mold split and what type of mold to make.