It doesn't matter what product you use. Everything has a shelf life. A best before date upon which to be used.
Unlike food however, we can actually increase or decrease shelf life. What would you say if I told you some of my resins are close to 2 years old and still good? That they still retain all the properties they should when the cast is fully cured.
Whats Homeworlds BIGGEST piece of advice? STIR WELL. Always stir your products in their original container and then mix well.
Next...Air is the enemy. In all of casting from the mold to the cast to the liquefied products...air is the enemy. I always try to get as good a seal as possible on my products when putting the lids back on as possible. Most times I need a small screwdriver to pry and a pipe wrench to get the lid off from some of the overspill drying. I consider this a good thing. It adds to an airtight seal.
Just because its 6 months old doesn't make it bad. Try it first. Don't just assume its garbage. Make sure its mixed well in its original container. Remember...2 minutes is a long time. Your arm should be tired. Then when you combine the products, be sure to mix well again. Most problems can be attributed to improper mixing. That's why I prefer products with a slightly longer pot life.
Monday, December 26, 2016
Sunday, December 11, 2016
Master Orientation
Probably one of the harder processes of making a mold. Orientation doesn't matter so much with smush molds, but with Sprue Molds its very important.
Basic science says Gravity works with the path of least resistance. When poured resin will follow this rule. Gravity will pull it down and a path through the silicone mold will guide it. The resin flow will push the air out the vent paths.
But how do you orient you master? The rule I always try to follow is Point It Down. This is aided by our 2 rules. You never want your resin to have to flow up into an enclosed space. This will create an air pocket. The air is trapped with no place to go. So your resin flow should always be down.
Sometimes this is unavoidable because of the shape of your master. If putting in a vent is not a viable choice, you can modify the mold. Just cut a little bit of the mold to create a pocket for the air to escape into.
A vent is a smaller channel that simply allows air to escape. This will fill with resin so you don't need very big channel and you will clip these parts off and throw them away or keep them to use as channels for other molds. A toothpick will make an excellent vent minimizing the wasted resin that will fill it.
The more complex your sprue mold, the harder it will be for the resin to travel through the mold. I would recommend a resin with a longer pot life to ensure it doesn't start to cure while you are still pouring.
When pouring the resin, we are fighting the properties of Adhesion. Adhesion is what keeps a drop from going completely flat on a surface. The water adheres to the surface, keeping the water drop from covering more surface area. This is the same with resin.
Conversely...Sometimes before you pour your resin, you might want to apply a little bit of resin to hard to reach areas before you pour. When the resin hits this area its will use the properties of Cohesion, attaching itself to a liquid of similar properties to help it advance through the mold channels eliminating the chance an area wont get covered with resin and leave you with an air pocket.
I'll update this soon with some pictures.
Saturday, December 10, 2016
Sprue Mold
A SPRUE MOLD...is an enclosed mold that uses a series of channels that allows the resin to flow inside it, with vents that allow the air to escape.
Sunday, November 27, 2016
INTERLOCKING 4 PIECE MOLD
When I first got into casting, I spent the 1st few months experimenting before I did Roboid. One of the experiments was to make a mold that would allow a double pour.
As stated many times, unless absolutely necessary, I hate painting. So if I can, I will double pour. Double pour is a term given to using multiple pours of resin, usually tinted to make a cast.
To do this, you have to work from the outside in. You do the outside detail before you do the main body of the cast.
Im not to sure how to describe this process. Each piece of the mold needs to hold part of the next piece of the mold it is attached to. So the parts of the mold need to be interlocking.
This project was my first figure. Chiron, who ironically has a Canadian history along with a base history of knowledge including medicine.

In the above picture, the red resin would be laid in the far left and right mold parts. This will make the red cross. In the center mold, the mold would be tipped so the red resin can be cured in the divots that will make the red dots in the saddle. This took 2 applications. One for each side. After the red resin has been poured/cured, the white resin can then be poured.
When doing the initial pour, you must be VERY careful to not overfill the cavity you are filling.
Conversely, once you have cured the initial pour, it is very critical you not flex the mold in any way that could lift these initial pours from the mold. OTHERWISE...what happens is when you pour the bulk resin, it will get underneath the initial pour. You will have to scrape away the 2nd pour to uncover the 1st pour. Unfortunately at the time I didn't realize the importance of "FAIL" pictures.


As stated many times, unless absolutely necessary, I hate painting. So if I can, I will double pour. Double pour is a term given to using multiple pours of resin, usually tinted to make a cast.
To do this, you have to work from the outside in. You do the outside detail before you do the main body of the cast.
Im not to sure how to describe this process. Each piece of the mold needs to hold part of the next piece of the mold it is attached to. So the parts of the mold need to be interlocking.
This project was my first figure. Chiron, who ironically has a Canadian history along with a base history of knowledge including medicine.
 |
| CHIRON |
Double pours were able to be done in the standard smush molds use for this figure. Colored drops of red resin were dropped into the appropriate places in the mold using a pin. The parts were then pressurized and allowed to cure. Then the white resin was added to the mold cavities and everything was pressurized again. This is the end result. Below are the parts of the Interlocking 4 pc mold. By Interlocking, I mean the mold has both a male and a female alignment pin.
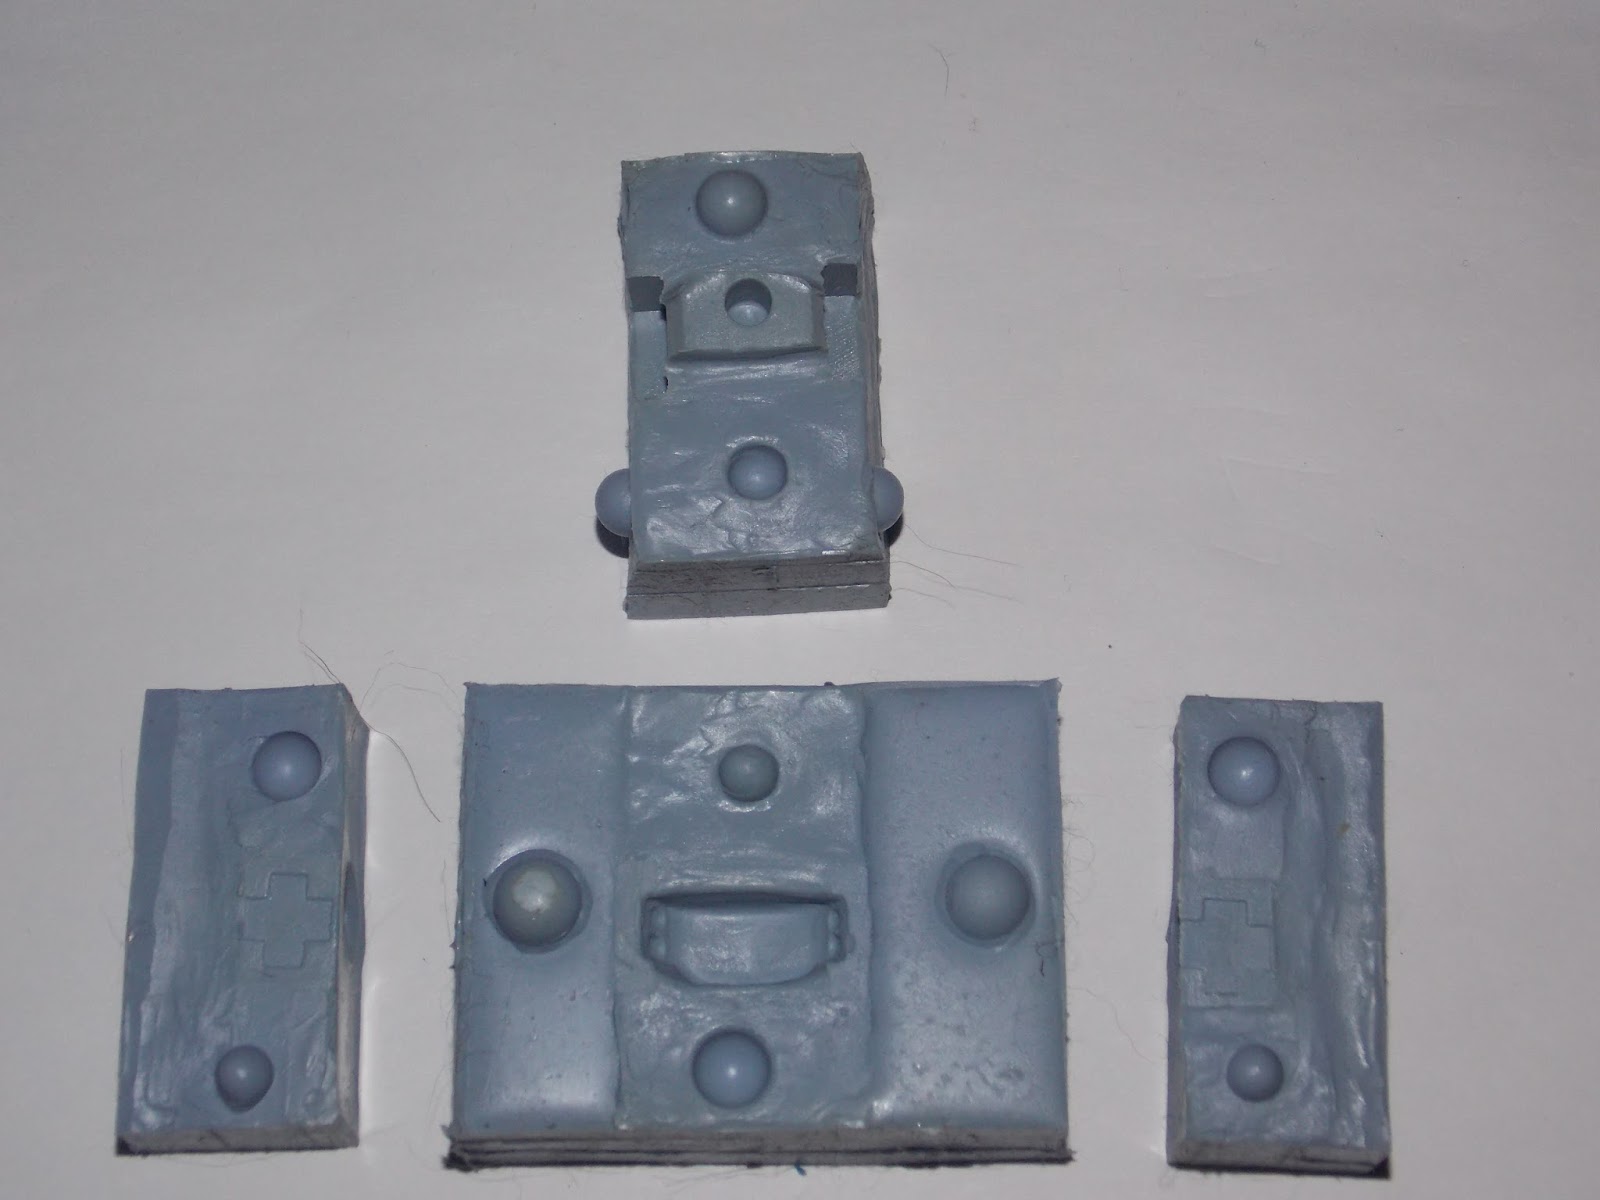
In the above picture, the red resin would be laid in the far left and right mold parts. This will make the red cross. In the center mold, the mold would be tipped so the red resin can be cured in the divots that will make the red dots in the saddle. This took 2 applications. One for each side. After the red resin has been poured/cured, the white resin can then be poured.
When doing the initial pour, you must be VERY careful to not overfill the cavity you are filling.
Conversely, once you have cured the initial pour, it is very critical you not flex the mold in any way that could lift these initial pours from the mold. OTHERWISE...what happens is when you pour the bulk resin, it will get underneath the initial pour. You will have to scrape away the 2nd pour to uncover the 1st pour. Unfortunately at the time I didn't realize the importance of "FAIL" pictures.


And finally...the finished saddle. After the red was poured/pressurized/cured, the white resin was poured and processes were repeated.
PLEASE...If I have been unclear in anyway or you feel I could make this easier to understand, please send me an email. I read all mail and strive for user friendly instructions. Your feedback is highly appreciated.
One last thing...when dealing in clear colors and double pouring, colors will change. if you have a clear red over a blue, it wont look like it. Double pours I would recommend limiting to solid colors. But the best results are found during experimenting. :-)
Sunday, November 20, 2016
4 Part Mold
I finally found all the original pictures of the 4 pc mold. The post is in draft form as it requires a narrative that is taking me hours to word properly.
Expect any day now.
Expect any day now.
Thursday, November 17, 2016
Smush Mold Finished Casts/Figure
Now the magnets was just to give you ideas.
But I really meant it when I said I AM LAZY. I'll spend time in other areas if the end result saves me time. I could have simply cast the Dianaut Body in a hard plastic resin. But I opted instead to make actual steel pins. Why? Seems like a lot more work...no?
Actually, just a few minutes. The reasons I opted for steel pins is...
A) As far as I know, no Garage Kit Caster has done these figures with steel pins, so its an identifier. I can say hey...that's MY work.
B) It saves me work and therefore time. These are incredibly small. To try and trim the flashing on those little arm/leg pins is a nightmare. You actually run the risk of clipping off the pin while trimming it. With a steel pin, I don't have to worry about it and can run the knife blade along the pin without worry about cutting the pin off. I can actually trim the flashing nicer and closer. So it saves me time, saves me from potentially scrapping a part and most importantly...doesn't drive me crazy and get me mad because I have eliminated the point that was most likely to give me grief. Its easier for me to make the pins than try and trim the pins.
I cast the legs with the original magnets in them. I can trim away the foot to install the smaller magnets I bought until I can find better fitting magnrts or magnets I can cut into without affecting their field.
Here's the end result.
Now that I know the steel pins work, I need to make more so I can make a bunch of these. The Yellow was done for visual purposes to contrast with the black. Chrome paint will ring the chest bump. Than can be sponged on. And little magnets will be installed in the feet.
But I really meant it when I said I AM LAZY. I'll spend time in other areas if the end result saves me time. I could have simply cast the Dianaut Body in a hard plastic resin. But I opted instead to make actual steel pins. Why? Seems like a lot more work...no?
Actually, just a few minutes. The reasons I opted for steel pins is...
A) As far as I know, no Garage Kit Caster has done these figures with steel pins, so its an identifier. I can say hey...that's MY work.
B) It saves me work and therefore time. These are incredibly small. To try and trim the flashing on those little arm/leg pins is a nightmare. You actually run the risk of clipping off the pin while trimming it. With a steel pin, I don't have to worry about it and can run the knife blade along the pin without worry about cutting the pin off. I can actually trim the flashing nicer and closer. So it saves me time, saves me from potentially scrapping a part and most importantly...doesn't drive me crazy and get me mad because I have eliminated the point that was most likely to give me grief. Its easier for me to make the pins than try and trim the pins.
I cast the legs with the original magnets in them. I can trim away the foot to install the smaller magnets I bought until I can find better fitting magnrts or magnets I can cut into without affecting their field.
Here's the end result.
 |
| Cast Body with Steel Pins Inset |
 |
| Dianaut Assembled Front View |
 |
| Dianaut Assembled Side View |
Sunday, November 13, 2016
Clay Beds
Like I have said many times...Im lazy. But I'll spend half an hour, an hour or a day extra f I know its going to save me time in the long run down the road.
I use clay as a bed. There are different types and hardness. I just use a simple medium clay. It needs to be worked. The warmer it is the easier it is to manipulate. But its still a pain in the ass. So I try to save them if I can. If they haven't been coated once too many times, then I'll re use them as its less time consuming than starting from ground zero. But eventually the clay gets too covered in sealant and mold release it needs to be thrown out.

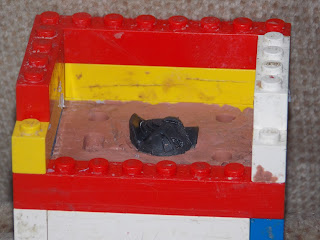
The use of LEGO means I can remake the frame to the exact same dimensions. MEGA BLOCKS (not recommended) deteriorate and never put LEGO through the dishwasher.
I use clay as a bed. There are different types and hardness. I just use a simple medium clay. It needs to be worked. The warmer it is the easier it is to manipulate. But its still a pain in the ass. So I try to save them if I can. If they haven't been coated once too many times, then I'll re use them as its less time consuming than starting from ground zero. But eventually the clay gets too covered in sealant and mold release it needs to be thrown out.

The use of LEGO means I can remake the frame to the exact same dimensions. MEGA BLOCKS (not recommended) deteriorate and never put LEGO through the dishwasher.
Thursday, November 10, 2016
Magnets and Molds...The Purpose
Now in this case with these Dianauts, where I am using magnets...there will be a little divot in the mold to actually hold the pin. But being a smush mold it will be subject to movement before I close it, so every little bit helps.
More importantly, the magnet was used to stimulate your thinking beyond the box into how you can use silicone molds to your advantage. How you can use magnets or anything else to help you create the mold.
There are no set rules to making silicone molds. You are only limited by your imagination. For another example check out the 4 piece mold I made years back so I could double pour.
EDITORS NOTE: I just noticed my post on the 4 pc mold focuses on the result not the mold. I'll be expanding on it with mold pics. Im sorry.
Sunday, November 6, 2016
Magnets and Molds
Im trying an experiment. If it fails, no harm done. I can still use the mold.
In industry, you never have a pin and a hole made of the same material. If they jam, they will basically weld themselves together. One is usually a milder or softer material meant to be replaced with wear.
In particular is the Diaclone Pilots. They have metal pins for the which the arms/legs to hitch onto. It lessens the wear. I was considering only making half the mold and then putting in the pin by hand and then pouring the second half and thought that left too much room for error. Plus I want the resin to 100% cure around the pins I make for this.
So Im trying to see if I can use magnets to hold the pins in place when I pour the resin. I simply laid the magnets on top of the bed. This way except for one face, the entire magnet field is held in the silicone.


In industry, you never have a pin and a hole made of the same material. If they jam, they will basically weld themselves together. One is usually a milder or softer material meant to be replaced with wear.
In particular is the Diaclone Pilots. They have metal pins for the which the arms/legs to hitch onto. It lessens the wear. I was considering only making half the mold and then putting in the pin by hand and then pouring the second half and thought that left too much room for error. Plus I want the resin to 100% cure around the pins I make for this.

If it doesn't work, I can simply remove the magnets and fill in the space with more silicone.

Now to wash it up and pour the silicone and see if it works. On a personal note...I always make one alignment peg different than the others. Its easy to get confused when pouring and get your orientation of the mold halves mixed up.
Saturday, November 5, 2016
Where to Put the Mold Split? Smush Molds
Where to put the mold split? That might seem like a weird question...but we are not doing injection molding so it becomes a very pertinent question.
You actually have to answer a few other questions. First you need to determine the orientation. Orientation may also determine what type of mold you want to use. Today we're going to talk SMUSH molds. We'll talk about Sprue molds later.
These are all just my opinions based on my results. You may not need to do some of the things I do based on what you are casting.
One of the benefits of silicone molds is we can put the mold split where ever we want. Im lazy. And I want to do as little sanding as possible. So when I make a SMUSH mold, I like to "Bury" the master so that 1/2 of the mold is more of a lid. This then puts the mold split on a corner. So then if there is any sanding its very little and wont affect the detail.
I also don't like to put a mold split on a peg, or a hole or where a size is critical or concentricity needs to be maintained. I avoid putting mold splits in those areas.
Here's an example of this. The Sultan mold for the head.
 Notice how one half of the mold the one on the left is more of a lid. The other half (on the right) is more of a cup. Also the head peg is fully contained. So any sanding is all along the edges of the cast, the peg is fully concentric and true to the master and we can bend the silicone enough to remove the cast without damaging the mold.
 You need to be sure this peg hole gets resin in it and I like to use a pin to smear it around and make sure the sides are at least coated. Im being picky, but there is a science behind this. Things like cohesion and adhesion are simple science concepts but they can wreak havoc on your casts.
Here's another example using the Jade head. It still needs to be washed before I pour the silicone. I threw it quickly together for this post.

You actually have to answer a few other questions. First you need to determine the orientation. Orientation may also determine what type of mold you want to use. Today we're going to talk SMUSH molds. We'll talk about Sprue molds later.
These are all just my opinions based on my results. You may not need to do some of the things I do based on what you are casting.
One of the benefits of silicone molds is we can put the mold split where ever we want. Im lazy. And I want to do as little sanding as possible. So when I make a SMUSH mold, I like to "Bury" the master so that 1/2 of the mold is more of a lid. This then puts the mold split on a corner. So then if there is any sanding its very little and wont affect the detail.
I also don't like to put a mold split on a peg, or a hole or where a size is critical or concentricity needs to be maintained. I avoid putting mold splits in those areas.
Here's an example of this. The Sultan mold for the head.


Here's another example using the Jade head. It still needs to be washed before I pour the silicone. I threw it quickly together for this post.

Notice the mold split is in areas easily sanded with the least effect on detail as well as the fact the peg is completed buried in the clay. Whatever is clay will be replaced by silicone when we make the second half of the mold.
The next thing is you want hard lines and corners. You don't want to press the master into the clay. You want the master to be held tightly in the silicone. If the clay holds the master too tightly you risk pulling the master out of the silicone before you get a chance to make the second half of the mold. This can sometimes cause problems. If the master doesn't seat properly you will get an air pocket and a deformed/thicker cast than you want.
This next bed took me a few hours to make.

Remember years ago I said my pocket knife was my favorite tool? Well I use my pocketknife to cut hard clean lines around the master. This makes for clean edges. Less flashing and most importantly, less sanding. I used the tip of the knife to pack clay around and into the corners to give me hard lines. its easier to do now that try and manipulate cured silicone. Remember...this is the most crucial part of the mold process. What you do here determines how much or how little work you will be doing later on. Here is not the place to take shortcuts. Take your time. Do a good job and you'll be rewarded and thankful later on.
Silicone Smush Molds
For garage kit casting I use silicone to make my molds. This provides some flexibility that we need to make some items as we don't have the same luxury as steel molds with injection molding.
I use smush molds for small HIGH detail parts where a sprue system is impractical. Another thing, Injection molds are a 50/50 split. This can be problematic for garage kit casting. Steel molds don't give. They have no flashing. If you have flashing on your cast...your mold gave. That means your cast is now just a little bit thicker than it should be. If you are casting 5mm pegs this is now a serious problem as your pin is now bigger than 5mm and most likely out of round.
Silicone provides ways of working around this. Because silicone does have give...we can make molds using the flexibility of the silicone to help release cast parts. We can bend the silicone mold to release parts. Something not possible with steel injection molds. Hence the 50/50 mold split in injection molding.
Silicone molds are great, fun and easy. The hardest part, is determining just WHERE to make you mold split and what type of mold to make.
Friday, October 14, 2016
Shapeways Materials Tried
So far, I have tried these materials from Shapeways. Here's my pov.
Frosted Detail...Nice detail, but the texture is inconsistent. It varies from smooth to rough. No consistency. I wasn't fond of it, so I moved on.
Black Acrylic...segmented. fuzzy. Worst one yet for holding tolerances on simple shapes. Don't like it at all. Detail success rate depends on which side of the acrylic its one. One side is worse than the other.
Stainless Steel...if you are dead certain your print is done to your specifications, I rally like the Stainless Steel. Finished it has the look of a metal cast product. It looks porous but Im very happy with it.
Black Acrylite...pending...waiting on product ordered in this material.
Saturday, October 8, 2016
Magno's Sold...
Well...I cant lie. While I don't regret selling them, I cant help but feel a little melancholy.
Outside of a few GEAG's, a few red Falcons and a Awesome Silorg Warrior...Im one pending sale away from having sold them all. 2 empty shelf cases. I was so very proud of that collection. Still am. Im thankful I was able to find good respectable homes for their care. A piece of me goes with each one. Nothing lasts forever in this world. I don't have any kids and they'll never name a street after me. But I can pass these along.
Thanks to everyone who took part in my sale or plan to. And my thanks to everyone who helped me build this awesome collection of Magno's in the first place.
If I had it all to do over again...I would.
Big Man Toys
I just want to give a shout out to my good friend over at Big Man Toys...Lee.
Lee has really taken his craft to new levels. Self educated with 3D modelling and really pushing himself. So much so I was more than happy to ask his help when Bry was overloaded with work.
I'm only a craftsman. Lee is a true artist/sculptor. And it shows in his modelling. Lee modelled Jades/Ronins head and did an excellent job. Im only sorry I wont be adding artwork to the figure so I can give him the credit he deserves.
Lots of VERY COOL goodies over at Bigman Toys, great prices and tons of very down to earth and practical advice. You'll find the link to his site on the right hand side of this blog under "Homeworlds Hot List".
Well worth the visit.
Thursday, October 6, 2016
Mounted Missile Pack
It looks a bit different without the ball adapters. Looking at it now, I may have to redesign the Centaurus body (if possible) or these wont fit the Centaur form. But I think they look not too bad.


 Ready to order...$15.00 each...$7.50 S/H...Tracking +$5.00
Available in Black And White for Sultan and Flight Commander...
Black and Gold (gold is air brushed) for Overlord.


Available in Black And White for Sultan and Flight Commander...
Black and Gold (gold is air brushed) for Overlord.
Wednesday, October 5, 2016
Mini Missile Pack "WITH" Pics
Bry modelled the holder and the nose cones. I made the masters for the missile bodies. Bry had modelled the bodies, but Shapeways had issues with it being so small. We think the missile fins most likely. As it is, it was just as well as I needed the missile body in 2 parts for easy casting. More initial work, but less headaches down the road.
The result?
Its the proto. The 1st one. Its raw and not finished. It needs a wash and some clear coat. The missile cones are tinted red. NOT painted.

 Im liking this a lot! But to anyone familiar with the Micronauts/Microman/Palisades and related magno figures, It looks a bit odd on the figure without the ball adapters on the end of the missile. Its a good fit otherwise and sure spices up the figure. I'll post a pic of it mounted to Sultan later tonight.
The result?
Its the proto. The 1st one. Its raw and not finished. It needs a wash and some clear coat. The missile cones are tinted red. NOT painted.


Saturday, October 1, 2016
Mold: A Definition From A Casting Perspective
What is a mold?
A mold is a hollow encasement that when filled produces a desired shape.
That's the easy question.
How do I make a mold?
Believe it or not, there is no wrong answer to that question. The answer depends on many variables. You have to consider the part, where to put the mold break line, orientation, sprues if used, are you doing multiple pours, can part be easily removed from the mold, how many are you making and many other possibilities.
I have made a 4 piece mold. As long as its tight fitting, make 6 or 7 piece molds if need be. Don't be afraid to get creative. There is no wrong way to make a mold. If it works...you did it right regardless of how you did it.
However there are some methods for making basic molds that really an make life simple.
Its time we reviewed and updated Garage Kit Casting.
Monday, September 5, 2016
WHY UPS SUCKS!
This is why I dont use UPS. Ask Bry...they were going to throw a package in the garbage because they deemed it undeliverable on him. No thought of returning it to sender.
But this is exactly why I don't and WONT use UPS if I have a choice about it. Click on link.
UPS THROWS OUT 100 YR OLD HEIRLOOM
But this is exactly why I don't and WONT use UPS if I have a choice about it. Click on link.
UPS THROWS OUT 100 YR OLD HEIRLOOM
Tuesday, August 9, 2016
TIGER TANKS
The reason my Tiger Tanks are being held back is because the white KO Tiger Tank motor doesn't work. Someone in their infinite wisdom thought it a good idea to manualize the vehice and removed gears from the motor. I was able to find the gears I needed to make it work, but whoever did this damaged the gears shaft housing.
I was able to get another working motor and need to switch it into the tank. Then I want to take a video of all 3 running at the same time. Then Im good to sell them. :-)
I was able to get another working motor and need to switch it into the tank. Then I want to take a video of all 3 running at the same time. Then Im good to sell them. :-)
Monday, July 4, 2016
New Marauder Art By Jamie Koebel
I just received my commissioned Marauder from Jamie Koebel. He as really taken his craft to another level this past year and a half. While the actual colors are yet to be finalized, this isn't far off of what I am looking for with Marauder.
LOOKING GOOD JAMIE!!!

Jamie and I have some details to work out, but if he and I can come to an agreement, Jamie Koebel will be the featured artist/illustrator for the Marauder One Shot.
LOOKING GOOD JAMIE!!!

Jamie and I have some details to work out, but if he and I can come to an agreement, Jamie Koebel will be the featured artist/illustrator for the Marauder One Shot.
Wednesday, June 22, 2016
DAVE WAUGH on EBAY...ISO on INSTAGRAM
Calm down.
Yes Dave Waugh is selling some items on Ebay. He is only selling dupes to help pay for the move. Dave is hardcore Micronauts. He isn't selling off his collection.
HOWEVER, do expect him to sell off his Microman collection in the near future.
In other Dave Waugh news, he is smack dab in the middle of putting ISO onto Instagram. It looks good...and I don't own a cell phone.
So for all you Micronaut fans celebrating the latest Hasbro announcement, Dave gives you one more candle to put on your cake! :-)
Friday, May 27, 2016
DAVE WAUGH Stolen Artwork Includes...
 |
| STOLEN...PRINT 10 OF 12 |
 |
| STOLEN...PRINT 10 OF 12 |
 |
| STOLEN...ORIGINAL ARTWORK ARTISTS PROOF |
Thursday, May 26, 2016
DAVE WAUGH ARTWORK..."STOLEN"!!!
I won 2 auctions on Ebay. Both were prints of Dave Waugh's original artwork offered by 'energonmatrix'.
Apparently sometime today, someone broke into his garage and stole a bunch of stuff which included the Dave Waugh prints. I asked for the print numbers so people can look out for them.
So I wont be getting any new Dave Waugh art now. SHIT!
Apparently sometime today, someone broke into his garage and stole a bunch of stuff which included the Dave Waugh prints. I asked for the print numbers so people can look out for them.
So I wont be getting any new Dave Waugh art now. SHIT!
Saturday, May 21, 2016
New 'Toys'
Yes its junk...but for $4.00 and free shipping I cant say no. I cant make it for this cheap. It costs the company $5.50 every time I take a dump.
But for plastics these tools work great and will save the palms of my hand from getting hole in it by spinning drill bits in my hand.

Each "Holder" or pin vise holds a collet at each end. The collets are also double ended with different size ends to hold various size drill bits from around .090" and under. PERFECT! The pilot hole is the worst one to drill by hand.
I also have a small jewellers drill coming any day now as well. Simply push down and it spins the drill.
Thursday, May 19, 2016
TOM V...THANK YOU
I would like to take this time to thank a great humanitarian, a fantastic human being, and all around gentleman.
Heres the thing. I don't need to explain. You all know it to be true.
Before FB locked me out a second time...I like to think it was fate...I was able to acquire a small item from Bill Jones collection with a huge meaning...to me. Last night...it arrived. Bill would be pleased. Happy Days Matchbox truck. Bill would get it. Im at a total loss for words. But Tom...thank you. This means the world to me.

Also included in the package was a green 12X. A VERY nice clean figure that was supposed to ride the Gold Dober and match Dave Waughs Art. And finally...Something VERY cool. Tom V did something for me and I would like to thank my wife for going behind my back and emailing him.
Included in the package was something Tom called "home made" and I called bullshit on him. Well the bullshit's on me. Tom was directly involved in the making of this EXTREMELY LIMITED officially licensed product. AND HE GRACIOUSLY GAVE ME ONE...I cant thank him enough...AGAIN!

I know I have issues, and to those who have taken the time to understand them and not judge me...I thank you. I have met so many good people by collecting Micronauts. it would be an insult to try and name you all. When I see all the crap going on in the world and how many simply AWESOME Micro fans that I can call friends...Im humbled. You people restore my faith in mankind.
And Tom...there aren't enough words in the English or any language to describe just how much of a fantastic man you are. Not that I would need to. EVERYONE KNOWS IT.
Thank you ever so much...from the bottom top and center of my heart...Thank you.
Heres the thing. I don't need to explain. You all know it to be true.
Before FB locked me out a second time...I like to think it was fate...I was able to acquire a small item from Bill Jones collection with a huge meaning...to me. Last night...it arrived. Bill would be pleased. Happy Days Matchbox truck. Bill would get it. Im at a total loss for words. But Tom...thank you. This means the world to me.

Also included in the package was a green 12X. A VERY nice clean figure that was supposed to ride the Gold Dober and match Dave Waughs Art. And finally...Something VERY cool. Tom V did something for me and I would like to thank my wife for going behind my back and emailing him.
Included in the package was something Tom called "home made" and I called bullshit on him. Well the bullshit's on me. Tom was directly involved in the making of this EXTREMELY LIMITED officially licensed product. AND HE GRACIOUSLY GAVE ME ONE...I cant thank him enough...AGAIN!

Can you BELIEVE this?
I know I have issues, and to those who have taken the time to understand them and not judge me...I thank you. I have met so many good people by collecting Micronauts. it would be an insult to try and name you all. When I see all the crap going on in the world and how many simply AWESOME Micro fans that I can call friends...Im humbled. You people restore my faith in mankind.
And Tom...there aren't enough words in the English or any language to describe just how much of a fantastic man you are. Not that I would need to. EVERYONE KNOWS IT.
Thank you ever so much...from the bottom top and center of my heart...Thank you.
Wednesday, May 18, 2016
Dave Waugh on Ebay
Dave Waughs "THERE GOES THE NEIGHBOORHOOD" is currently up on Ebay.
IT ISNT MINE...
http://www.ebay.com/itm/Micronauts-Microman-Dave-Waugh-MicroHeritage-Mego-2007-Alien-Repto-Antron-Kronos-/121989844118?hash=item1c67294c96:g:TsIAAOSwKfVXKqxO
IT ISNT MINE...
http://www.ebay.com/itm/Micronauts-Microman-Dave-Waugh-MicroHeritage-Mego-2007-Alien-Repto-Antron-Kronos-/121989844118?hash=item1c67294c96:g:TsIAAOSwKfVXKqxO
Wednesday, May 4, 2016
OT:FRIDGE MAGNET FUN AND STAR WARS
I recently bought some Star Wars Classic Figures. 9 figures to this set. These figures are about 3/4" tall. EXTREMELY small. THANKS VINCE!!!
And just perfect for me. I only saw the first 2 SW movies. And I thought how cute. But I knew I would 'do' something with them....I just didn't know what when I bought them.
Well, Im getting a glass of milk and staring blankly at the fridge door. Then it hits me. I grab one of the fridge magnets, (REMAX REAL ESTATE FRIDGE MAGNET RULER) the gorilla glue and go to work. I cut some strips off the magnet. glued the figures to the magnetic strip and trimmed them up after the glue dried. I keep them temporarily in an old steel cigarette case which I will turn into a small space scene.

This second picture (below) shows them magnetically stuck to the cigarette case.

Wednesday, April 27, 2016
Tinting and Physics
Is it physics or science? Amazing the things we retain from school that we thought we'd never need or use.
Tinting is an art unto itself. Do what you want here. I don't believe recording results on paper will help.
Tinting is different for different types of resins. For the clear urethane resins, a tiny pin drop of resin is too much. The light blue you wanted is now midnight blue. If you are using a white resin, you need to over power the white or your navy blue comes out as a light sky blue. Regular colors are more akin to pastels. So you might use a couple of rain drops of resin.
And then there is the laws of Physics. The laws of Cohesion and Adhesion. These laws basically state that a liquid will "cling" to its container and grab it. If you look at a spoon with water in it, you can actually overfill the spoon to almost twice its capacity. The water grabs the edge of the spoon and starts to bubble up in the center . In a container, it ''climbs'' the side of and gives a "U" impression with the sides higher in the jar/container than in the middle.
So when you squeeze the bottle of dye, the drop is never the same. Sure the hole size in the tip of the bottle never changes, but if you squeeze slowly, you can virtually create a drop of dye any size you want. And if Im working with urethane and need only a smidge... how do you halve a pin drop?
Well enter my darling wife to the rescue. My wife is not one of the fashion boutique women who spends all day getting her nails done, but she is VERY smart. And she recommended these nail polish painter balls.
They are small balls of different sizes attached to a pencil like shaft. You use these to put the paint on in controlled amounts. So I made a few at work and will use them to try and get more control over the amount of dye Im adding.
Otherwise, you could (I have) end up making 7 casts or more or less before you get the color you are trying to match. Its trial and error and very hit and miss.
Pics Coming in a bit...
Tuesday, April 26, 2016
Self Aligning Mold
Here is a better view of the Self Aligning mold being tested on Marauders feet. The center hole is not for alignment but to ensure the mod stays together at the center. The square build up ensures the mold can only go together one way and will not slide, so no alignment pins are needed. As its a sprue mold, I will be using backing boards to keep the mold from splitting.
I'll complete the mold next weekend and report my results.

I'll complete the mold next weekend and report my results.

**Post Edit**The mold is finished and turned out better than even I expected!
Sunday, April 24, 2016
Silorg Warrior Made By Takara...WOW
I'll be sure to add pictures. Im making some Silorg fists for a friend. Upon inspection, on the back was the date stamp 1979 TAKARA. I had no idea. Grandstand Convertors were made by Takara???
I was floored, but upon further reflection, shouldn't have been. This is by far the single most superior Magno I have ever owned. The magnet joints have such a powerful connection because of all the precision fits and bevels of the plates.
Paying extra because a figure is rare is common. But every once in a while you hit the daily double with being blessed at getting an item that is not only rare but built with excellent precision fits.
This one is it. For the first time in a long time I actually feel like I got a fantastic deal even though I paid over $500 for it. It is worth every penny. Pics coming shortly.
Wednesday, April 20, 2016
SELF ALIGNING MOLDS
Im working on some mold designs that will eliminate the dents you put in the mold for alignment. Basically, its almost self aligning. Its like a jigsaw puzzle piece, it will only go together one way. It doesn't require any extra work or effort on my part.

The sprues will be on the bottom of his feet. An area easily sanded. Rather than sink the part into the clay, (when you push the piece into the clay, if it isn't a thick enough part, you can stress the master and even slightly misshapen the part and flaw your mold. Building the clay up and around the master takes more time, but provides a truer mold and better casts. ALSO...pushing the part into the clay makes the part ''stuck'' in the clay. The clay will not want to easily release from the master when you flip it over to make the 2nd half of the mold. You run the risk of the master separating from the freshly poured/cured silicone of the first half of the mold. If this happens an air pocket will develop and fill with silicone when you do the second half. This little film in the air pocket will fall out after a cast or two and the you get a distorted cast.
Building up the bed around the master takes longer but provides for easy clay removal when doing the second half of the mold ensuring the master does not move.
This took me about 5 hours for this half.
I'll post the results after I finish the 2nd half and if it works as well as I hope. The pin in the center isn't needed. After I took the picture I had this idea. I have since removed it.
Sunday, January 3, 2016
WILL JONES CUSTOM
WILL JONES gets the nod for HOMEWORLDS first Custom of the Month. I said I wouldn't critique...that, I see now, is going to be extremely difficult. If not impossible. So lets just wing it and see where that road to hell leads us...

Will Jones did an awesome job printing this Ampzilla(?) custom. It reminds me of a Lobstros hybrid. When I first saw it, I have to admit, I liked it but pictures can reveal TOO much. I also didn't realize how small the main body was. Which SHOULD have clicked in. That isn't a complaint. I for some reason simply thought it was bigger based on past pictures. I quite like the size of the body and overall size in general. It fits in well with other Micros. He did a great job modelling it.

My ONLY complaint is that technology has advanced WAY too much. I want to stay away from being critical. That is not the point of this post, But feel I have to be blunt at this point. Technology is working against poor Will. Camera's take such good pictures today. The clarity. Close ups. While they serve a purpose they can do just as much damage as good. And I don't feel that pictures taken of this custom have done it right. Mine or others.

When I look at it in my hands it is much MORE impressive than any pictures I have seen. Pictures show up the print lines with such clarity. Yet don't look near as exaggerated when you hold it in front of you. Lighting plays tricks. This is quite the custom. Im more impressed with it in my hands than I was looking at pictures of it. And its well priced especially when you consider the work put into designing it. Not sure where the antennae is supposed to go, I'll figure it out eventually.
The front guns point down, but Im guessing that's to keep true to the original design and to compliment the flow of the design and shape of the main body.
My collection is changing. Im selling off all my production figures and only keeping customs. This one will proudly take over newly vacated shelf space. Great Job Will.

Will Jones did an awesome job printing this Ampzilla(?) custom. It reminds me of a Lobstros hybrid. When I first saw it, I have to admit, I liked it but pictures can reveal TOO much. I also didn't realize how small the main body was. Which SHOULD have clicked in. That isn't a complaint. I for some reason simply thought it was bigger based on past pictures. I quite like the size of the body and overall size in general. It fits in well with other Micros. He did a great job modelling it.

My ONLY complaint is that technology has advanced WAY too much. I want to stay away from being critical. That is not the point of this post, But feel I have to be blunt at this point. Technology is working against poor Will. Camera's take such good pictures today. The clarity. Close ups. While they serve a purpose they can do just as much damage as good. And I don't feel that pictures taken of this custom have done it right. Mine or others.

When I look at it in my hands it is much MORE impressive than any pictures I have seen. Pictures show up the print lines with such clarity. Yet don't look near as exaggerated when you hold it in front of you. Lighting plays tricks. This is quite the custom. Im more impressed with it in my hands than I was looking at pictures of it. And its well priced especially when you consider the work put into designing it. Not sure where the antennae is supposed to go, I'll figure it out eventually.
 |
| Front Guns Point Down??? |
My collection is changing. Im selling off all my production figures and only keeping customs. This one will proudly take over newly vacated shelf space. Great Job Will.
Subscribe to:
Posts (Atom)