Ok///Im not going to waste time taking pics of these results. Colossal fail.
I made...1 drop, 2 drop and 3 drops of Orange dye in different cups.
I then did the same thing and added 1 drop of yellow.
When compared to vintage Antennae color,...None of them is close. Very dark orange. 3 drops of yellow was closer.
So that means...
A...this rubber accepts tinting very well and only a very little amount need be used to achieve color
B...I might need to lean more heavily on a yellow base with maybe a hint of orange
Next...this cures to a soft brown chicken eggshell. A slightly darker almond. Not off white.
And finally...Yes...this one I will post pics of later...This is my thoughts...the hardener is like honey. So when you stir it you stir air into it. Air bubbles can clearly be seen dotting the surface on the non pressurized rubber. Where as the pressurized rubber is of a much nicer surface finish.
So I would recommend pressurizing this. I keep thinking about how a Lobros tongue would be in rubber...lol...wouldn't have to worry about it breaking.
Sunday, November 26, 2017
Saturday, November 25, 2017
VYTAFLEX 40 TESTING
I have 7 different tests going on right now with the VYTAFLEX 40. I have different amounts of orange and yellow tints or combinations of and one without to see how close to the original color I can get.
I'm going to make one sample test and see how it turns out without being pressurized. Im sure it helps keep it from breaking down sooner as air bubbles are weak spots. But I want to see what happens to be sure. I pressurize all my stuff. Molds and casts at 55 PSI. 30-40 PSI is all that's required but I like to go just a bit more. It never hurts and cuts me some slack if there's a slow leak.
I picked up more silicone so I can remake the Lobstros Antennae mold correctly. I'd love to make a set of Clear Rubber Antennae...Im going to check into that. I'd buy and waste an entire container for a few sets. lol.
And my rivets arrived. I also found the missing rivets this morning. Im hoping to start the Roboid S2.0 in 3 weeks. The sooner I get them done the sooner I can get the Crimson Warrior done. Then I can start making some extra missile packs for September Sale 2018. And maybe a few other things so you can save on shipping.
Monday, November 20, 2017
Aluminium VS Stainless Steel Rivets
Stainless Steel Rivets...or Aluminium...Which to use?
I use Aluminium Rivets.
While both do not rust and the Stainless Rivets are shinier, I would recommend the Aluminium Rivets for one simple reason...They are easier to remove if you make a mistake.
Stainless Steel is hard on files. It dulls and wrecks them. You can actually melt the plastic from the heat generated simply filing them, trying to remove them.
They are also harder to set because the Stainless is harder than Aluminium. So the pressure needed to set them is greater than that needed for Aluminium. If you aren't careful...you can easily crack your parts.
There's nothing wrong with using stainless rivets. But you need to be aware that when setting them, you need to adjust your 'feel'.
Tuesday, November 14, 2017
VYTAFLEX TESTING...WASTE IS GOOD
Since I can think of no other use for this rubber resin than Lobstros Antennae, that leaves me with a lot of resin I probably wont use. I probably could find a use but I don't have the time for undertaking additional projects utilizing this resin at this time.
So what I am going to do is because the cure time is so long, Im going to pour a bunch of the same amount in Dixie cups each with different amounts of color and see which comes closest. Rather than fill the mold, wait 16 hours...repeat. Its not like I was considering keeping any of these casts. They are just tests so they are all garbage. They all have issues. First and foremost is the disgusting flash. So its easier and faster to just waste it experimenting with samples in disposable cups.
Wasting it this way will actually save me time and resin...and mold life.
One step closer to making a complete Lobstros. Once I have these antennae done, its just a matter of finding the time for the project. If I want to be ready for next years September Sale, I need to start making the figures for it by next month.
Monday, November 13, 2017
RUBBER URETHANE VYTAFLEX 40
Rubber Urethane VYTAFLEX 40 from Smooth On was used for the making of both Membros Hydrapipes and Lobstros Antennae. Here's what I found.
It has a 30 minute pot life and a 16 hour cure time. It is a 1:1 ratio mix. I pressurized these @ 55 PSI. I wouldn't cast period without a pressure pot. Resin/Rubber or Silicone. The results are night and day compared to not. And the casts are more solid and sturdier.
It is a very thick resin akin to pouring a thick honey. It will not do well in small detailed Sprue Molds. I needed to use a straw to help the rubber resin flow through the mold by controlled forced air into the straw. If you blow into the straw like you are filling up a balloon, you'll blow everything apart. TRUST ME ON THIS ONE! ;-) For larger casts with larger channels it would do better. The stuff I do is too small and detailed. And I don't see it taking to rivets all that well. Also its a very unforgiving resin. I don't know of a way to hide or fix flaws in rubber. So it needs to be done in one shot. The mold needs to be perfect because this resin doesn't hide flaws
Everything I expected to happen happened with the exception of color. Im very surprised at how well this took the color. It will need tweaking, but not nearly as much as I thought. It was a pleasant surprise.

The VF-40 is actually quite an incredible rubber resin. I would recommend it more for one piece cast figures. I find its uses limited for my purposes. Outside of the antennae I don't have a use for it, so I may have to get creative. But color options would be limited...unless...I wonder how a double pour would work with this??? MORE TESTING!!! :-) It would be the only way to get around single color casts...if it works and I don't see a reason for it not to.

The VF-40 worked very well for the Antennae. Im undecided as to whether it worked well or not on the Hydra Pipe. Its very floppy because it is so long and skinny. Im sure repeated attempts at plugging/unplugging the pipe will result in the peg(?) of the hydra pipe simply pulling off. It stretches incredibly at that thickness, but jeez I don't trust it staying on.
Im gonna play with it some and see if my suspicions hold up or not. DESTRUCTIVE TESTING!
Man wouldn't you love to be hosting MYTHBUSTERS? Hey man...what do you do for a living? Me? I blow shit up. LMAO
OK...like I said...I didn't want to make a 2 part split mold for the Antennae for many reasons and I was right. This is rubber, not plastic. I cant simply sand an incorrect part of the rubber cast. The length wise split mold has left flash that is a complete PITA to remove. You need a VERY sharp exacto knife or razor blade to carefully remove it. Not only does it leave a tell tail sign you cant blend in its too time consuming. Im remaking the mold to how I recently showed with the magnet so the mold split will be on the edge of the 5 mm peg portion. No flash. It has to be done that way. It'll look terrible otherwise. You can see it for yourself in the pictures. But like I said, I really only need to hit the color and I can make these no problem. I just need to finish the new molds when I get more silicone.
The floppy consistency of the VF-40 Lobstros antennae in comparison to that of the vintage is quite similar. These might be a touch softer, but unless you have an original in your other hand for immediate comparison, and even then...you would be had pressed to tell them apart. For making these Antennae, I would highly recommend using this product.
The lighting plays enormous tricks. In some pics they look almost 100% identical in color, when in fact they are not. Lobstros Antennae are a nice subtle orange. I used yellow attempting to overcome any peculiarities in the resin. I wanted to be sure a tint would work so I put in an extra drop. These antennae are a darker yellow...more of a mustard. It needs some orange to balance it out.
My antennae are NOT exact replicas. I made the master out of 4340 steel. It differs in that my spaces on the antennae are slightly closer together than vintage. This was done on purpose. If I should manage to hit the color accurately, I want to be sure my work and vintage can be easily distinguished. I will NOT have my work intentionally misrepresenting original figures or their accessories.
I calculated a shrinkage allowance into the 5 mm peg end and it fits nicely. They are not loose at all. Its a bit to buy a complete resin package for 2 Antennae if that's the only use you have for it. So Im gonna pump out a bunch of these for people who need them ONCE I get the color right or at least close and new molds made. AGGHH! That Flash is bugging me something fierce..
 Again, without an original in hand for comparison, even this shade of yellow isn't that bad.
And the better news...because of their nature and size, I can pop them in an envelope and mail them out for like $2 or $2.50
But I need to get more silicone and remake these molds the right way. These current casts are from molds I made a while ago. Im simply getting some use out of them by doing all my testing on them.
It has a 30 minute pot life and a 16 hour cure time. It is a 1:1 ratio mix. I pressurized these @ 55 PSI. I wouldn't cast period without a pressure pot. Resin/Rubber or Silicone. The results are night and day compared to not. And the casts are more solid and sturdier.
It is a very thick resin akin to pouring a thick honey. It will not do well in small detailed Sprue Molds. I needed to use a straw to help the rubber resin flow through the mold by controlled forced air into the straw. If you blow into the straw like you are filling up a balloon, you'll blow everything apart. TRUST ME ON THIS ONE! ;-) For larger casts with larger channels it would do better. The stuff I do is too small and detailed. And I don't see it taking to rivets all that well. Also its a very unforgiving resin. I don't know of a way to hide or fix flaws in rubber. So it needs to be done in one shot. The mold needs to be perfect because this resin doesn't hide flaws
Everything I expected to happen happened with the exception of color. Im very surprised at how well this took the color. It will need tweaking, but not nearly as much as I thought. It was a pleasant surprise.


Im also loving the fact I can make a decent rubber cast utilizing my already made silicone molds. And they are so very polite at being removed from the mold. It wouldn't surprise me if I was able to get an extra 50% more casts with the rubber because of how soft it is on the mold. Like all molds, mold life is greatly influenced by how rough you remove the cast.
The VF-40 worked very well for the Antennae. Im undecided as to whether it worked well or not on the Hydra Pipe. Its very floppy because it is so long and skinny. Im sure repeated attempts at plugging/unplugging the pipe will result in the peg(?) of the hydra pipe simply pulling off. It stretches incredibly at that thickness, but jeez I don't trust it staying on.
Im gonna play with it some and see if my suspicions hold up or not. DESTRUCTIVE TESTING!
Man wouldn't you love to be hosting MYTHBUSTERS? Hey man...what do you do for a living? Me? I blow shit up. LMAO
OK...like I said...I didn't want to make a 2 part split mold for the Antennae for many reasons and I was right. This is rubber, not plastic. I cant simply sand an incorrect part of the rubber cast. The length wise split mold has left flash that is a complete PITA to remove. You need a VERY sharp exacto knife or razor blade to carefully remove it. Not only does it leave a tell tail sign you cant blend in its too time consuming. Im remaking the mold to how I recently showed with the magnet so the mold split will be on the edge of the 5 mm peg portion. No flash. It has to be done that way. It'll look terrible otherwise. You can see it for yourself in the pictures. But like I said, I really only need to hit the color and I can make these no problem. I just need to finish the new molds when I get more silicone.
 |
| Showing Flash Issues On Rubber Casts |
The lighting plays enormous tricks. In some pics they look almost 100% identical in color, when in fact they are not. Lobstros Antennae are a nice subtle orange. I used yellow attempting to overcome any peculiarities in the resin. I wanted to be sure a tint would work so I put in an extra drop. These antennae are a darker yellow...more of a mustard. It needs some orange to balance it out.
My antennae are NOT exact replicas. I made the master out of 4340 steel. It differs in that my spaces on the antennae are slightly closer together than vintage. This was done on purpose. If I should manage to hit the color accurately, I want to be sure my work and vintage can be easily distinguished. I will NOT have my work intentionally misrepresenting original figures or their accessories.
 |
| Casts Supplied by Ray Miller /Steel Master Made By Me. |

And the better news...because of their nature and size, I can pop them in an envelope and mail them out for like $2 or $2.50
But I need to get more silicone and remake these molds the right way. These current casts are from molds I made a while ago. Im simply getting some use out of them by doing all my testing on them.
Sunday, November 12, 2017
VYTAFLEX TEST #1
I still another 7 hours before the VYTAFLEX Lobstros Antennae are fully cured. I leave everything alone for full cure.
However, I cut out the bottom of my disposable mixing cup and removed what was half cured on the bottom.
It seems colors are more opaque. While it is definitely a shade of yellow, Im gonna try a few more test pieces to see if I can change the shade some. Its a mustard yellow. Im hoping to get a lighter shade.
So I have a round urethane rubber disc. Its definitely rubber. And Im liking the properties. Although not fully cured, its flexible, bendable...everything a rubber should be and of a similar feel to that of the Lobstros antennae. But its still curing so it doesn't quite go back to its original form right away. It will once its fully cured.
From where I stand now...Im very optimistic about this product. If the antennae are as good as this disc, then we there man. All that is left is simply finding the right or an acceptable shade of color.
This I going to work VERY nicely. Im quite pleased.
VYTAFLEX 40 URETHANE RUBBER
Im currently trying something new. VYTAFLEX 40 a urethane rubber.
WOW. This is an entirely new animal.
I would NOT recommend this product for complex sprue molds. Its like pouring thick honey. It does have a 30 minute pot life and a 16 hour cure time. So tomorrow I'll know what happened.
If you must use this product for a sprue mold, make sure the channels are large. Also...I needed a straw to gently help the flow of this product through the mold. I would recommend this product for SMUSH molds over SPRUE molds.
Im not sure how it will cure or how it reacts to color. I tinted the pour yellow. We'll see how or if this translates into a yellow cast or not.
The one thing I am curious about is...I have a Membros Hydrapipe mold. So I filled it to see if it will work and how durable it might be once cured. If it works...it could be a viable option.
I should maybe consider a Parts Package. Where I package up various parts and sell them together. Would make shipping nicer for some of you...keep what you need and trade/sell the rest.
We'll see.
OOPS
WELL...apparently I have 6 or 7 types of resin going on and NO silicone. So the Lobstros Antennae molds will have to wait until Tuesday.
I do however have some molds I made of them a few years ago...they have a mold split line where it will hinder me and cause me some grief...but it will give me a chance to try out this new urethane rubber resin.
I do however have some molds I made of them a few years ago...they have a mold split line where it will hinder me and cause me some grief...but it will give me a chance to try out this new urethane rubber resin.
Saturday, November 11, 2017
MAGNETS AND MOLDS or LOBSTROS ANTENNAE.
Remember I discussed using magnets in molds...well here is a perfect example.
Here, Im choosing a vertical orientation. If we can avoid splitting the mold across detail all the better. The best orientation to avoid having to sand and restore detail for this project...
Are you ready...Lobstros Antennae.
So I made a Lobstros Antennae out of some very nice 4340. I only need one. I'll make 2 molds of it.
And as stated the best orientation IMO is vertical. Now...if I push the 5mm peg end into the clay, even just a little bit, this will give me a mold split tattle tale where I don't want/need one. On the 5 mm peg.
If we don't, there is nothing holding the 'master' in place and the silicone will knock it over when we pour it in.
So I added an earth magnet. I pushed it flush into the clay.


 This will allow me to essentially make a flawless cast with no cast lines save the top edge or according to the picture, the bottom edge of the master or on the edge of what will be the 5 mm peg. Shrinkage allowance has been calculated and added to the 'master' so when complete the 5mm peg portion of the antennae will indeed be 5mm and not a loose fit.
I am just making this now while other things are drying. I'll need to repeat this process to make 2 molds. I'll be using a urethane rubber as opposed to a silicone rubber so I can still use silicone molds. Also it will help differentiate my work from the original.
I put a lot of work and effort into my casts. I want people to know which items I made. :-)
I'll be working on this in my spare time this weekend. Hopefully I will have some working Lobstros Antennae by Mondayish???
Here, Im choosing a vertical orientation. If we can avoid splitting the mold across detail all the better. The best orientation to avoid having to sand and restore detail for this project...
Are you ready...Lobstros Antennae.
So I made a Lobstros Antennae out of some very nice 4340. I only need one. I'll make 2 molds of it.
And as stated the best orientation IMO is vertical. Now...if I push the 5mm peg end into the clay, even just a little bit, this will give me a mold split tattle tale where I don't want/need one. On the 5 mm peg.
If we don't, there is nothing holding the 'master' in place and the silicone will knock it over when we pour it in.
So I added an earth magnet. I pushed it flush into the clay.

This will now hold the 'master in place when I pour the silicone.

Here in this next photo Im holding it in the air to show how strong and capable the magnet is at holding the 'master' in place.

I am just making this now while other things are drying. I'll need to repeat this process to make 2 molds. I'll be using a urethane rubber as opposed to a silicone rubber so I can still use silicone molds. Also it will help differentiate my work from the original.
I put a lot of work and effort into my casts. I want people to know which items I made. :-)
I'll be working on this in my spare time this weekend. Hopefully I will have some working Lobstros Antennae by Mondayish???
THE T-555 Gold Dober
Im such an idiot. I was just mentally lining up projects when I realized I forgot to order rivets for the 5.5" Acroyear...OOPS.
The Titan Space Dober has Takara's highest numerical designation at T-551
Im making a new one...The Austin Titan GOLD Dober...the T-555 which according to numerical Asian numbering system means Go Go Go...lol.
Im waiting for parts. I have 2 orders left to make before I can start it which should give me the time to finish what I need doing.
Because of hardware issues this will be a One Off Custom.
Friday, September 15, 2017
HOMEWORLD 3-3/4" FIGURE PRICE LIST
THE FOLLOWING IS A PRICE LIST FOR HOMEWORLDS 3-3/4" ACTION FIGURES.
EFFECTIVE SEPTEMBER 15/17.
PRICES REFLECT LACK OF ARTIST PACKAGING.
ARTIST PACKAGING IS NOW RESERVED FOR EXCLUSIVE RELEASES.
PRICES REFLECT ENGINEERING/ASSEMBLING ADVANCEMENTS MADE SINCE PAST RELEASES.
COMMISSIONED RESIN FIGURES: $149.99
FULL URETHANE COMMISSIONED FIGURES $ 249.00
COMMISSION FIGURES GET MADE FROM BRAND NEW MOLDS MADE SPECIFICALLY FOR THAT COMMISSION TO ENSURE MAXIMUM DETAIL AND ACCURACY.
Urethane is much harder to work with and is harder on my fingers hence the price difference.
LISTED BELOW ARE PRICES FOR STOCK FIGURES.
ROBOIDS/DEIMOS...
 ROBOID FULL COLOR RESIN CAST: $74.99 Not Carded
DEIMOS RESIN FIGURE: $74.99 Not Carded
ROBOID/DEIMOS PAINTED: $59.99 Currently Unavailable
SULTAN/FLIGHT COMMANDER/OVERLORD/JADE/CRIMSON WARRIOR:
Please note glider packs are no longer available. It has been replaced with the traditional missile pack. Figure Stands Not Included.
OVERLORD: $84.99 Carded ($79.99 not carded)
FULL COLOR RESIN CAST SULTAN/FLIGHT COMMANDER/JADE
& CRIMSON WARRIOR: $79.99 Not Carded
PAINTED: $64.99 Currently Unavailable
FULL URETHANE: $99.99
FULL URETHANE TINTED: $99.99
Some details are painted on each figure. However a full painted figure is exactly that. The entire figure is painted.
HOMEWORLD MAY PUT SPECIFIC FIGURES ON 'SALE' DURING A SALE.
PLEASE CHECK ORIGINAL SALE POSTING FOR ADDITIONAL/INDIVIDUAL FIGURE 'SALES' PRICES.
EFFECTIVE SEPTEMBER 15/17.
PRICES REFLECT LACK OF ARTIST PACKAGING.
ARTIST PACKAGING IS NOW RESERVED FOR EXCLUSIVE RELEASES.
PRICES REFLECT ENGINEERING/ASSEMBLING ADVANCEMENTS MADE SINCE PAST RELEASES.
COMMISSIONED RESIN FIGURES: $149.99
FULL URETHANE COMMISSIONED FIGURES $ 249.00
COMMISSION FIGURES GET MADE FROM BRAND NEW MOLDS MADE SPECIFICALLY FOR THAT COMMISSION TO ENSURE MAXIMUM DETAIL AND ACCURACY.
Urethane is much harder to work with and is harder on my fingers hence the price difference.
LISTED BELOW ARE PRICES FOR STOCK FIGURES.
ROBOIDS/DEIMOS...

DEIMOS RESIN FIGURE: $74.99 Not Carded
ROBOID/DEIMOS PAINTED: $59.99 Currently Unavailable
SULTAN/FLIGHT COMMANDER/OVERLORD/JADE/CRIMSON WARRIOR:
Please note glider packs are no longer available. It has been replaced with the traditional missile pack. Figure Stands Not Included.
 |
| Flight Commander & Sultan Flight Packs No Longer Available |
 |
| Missile Pack Replaces Glider Pack |
 |
Jade |
FULL COLOR RESIN CAST SULTAN/FLIGHT COMMANDER/JADE
& CRIMSON WARRIOR: $79.99 Not Carded
PAINTED: $64.99 Currently Unavailable
FULL URETHANE: $99.99
FULL URETHANE TINTED: $99.99
Some details are painted on each figure. However a full painted figure is exactly that. The entire figure is painted.
HOMEWORLD MAY PUT SPECIFIC FIGURES ON 'SALE' DURING A SALE.
PLEASE CHECK ORIGINAL SALE POSTING FOR ADDITIONAL/INDIVIDUAL FIGURE 'SALES' PRICES.
Wednesday, September 6, 2017
INTRODUCING...BUGGER!
I RECENTLY POSTED MY VERY FIRST CUSTOM FIGURE TO FACEBOOK.
BUGGER. TO MY SURPRISE, HE WAS WELL RECIEVED TO THE POINT I WILL BE MAKING A FEW FOR SALE. Some changes will be in effect for the final design. Like no hardware and/or O rings.
HERE HE IS...BUGGER!

BUGGER. TO MY SURPRISE, HE WAS WELL RECIEVED TO THE POINT I WILL BE MAKING A FEW FOR SALE. Some changes will be in effect for the final design. Like no hardware and/or O rings.
HERE HE IS...BUGGER!

Saturday, September 2, 2017
DIFFERENT RESINS FOR DIFFERENT USES
I use different resins for different purposes. While yes, it is quite possible to make fully functional figures from one particular resin, here are some of the reasons why I use multiple resins.
I don't like painting. So for parts where I use tinting or dyes, I use color accepting resins. Resin color depends a lot on the resin you use, For example, white resin requires a lot of dye to achieve the desired color because you have to 'overcome' the white. If you use an insufficient amount of dye, you get a pastel color. Pink instead of red.
Articulation for mating parts where practical. This is actually quite important. While it hasn't been an issue so far, it is best to use different resins for mating parts that articulate. If the material of a peg is identical to the material surrounding the hole it goes into, the similarities of both could contribute to the peg essentially welding itself into the hole. In industry, pins are never the same material for that exact reason. One is usually softer metal to prevent this. Its why Homeworld has recently changed to urethane arm pins and a different resin for the torso.
Some resins have longer or shorter pot life. I vary between each depending on how many molds or how intricate a mold is. If Im pouring a lot, I use longer pot life resins.
Some resins are harder when cured than others. But the harder they are, the more brittle they become.
Some resins can handle higher heat temperatures than others like the black onyx.
And then there are resins that handle paint better than others.
Before you buy your resin, talk to your local retailer and discuss your project and needs with him to help you select the resin that is best for your project.
Sunday, August 6, 2017
HOMEWORLDS FIGURES
A little bit on Homeworld's Figures.
All of Homeworld's figures are hand made. While I may have the Master 3D printed, Homeworld does not 3D print any of its parts. In fact, some of the masters needed were so small they could not be printed and had no choice but to be made by hand.
Molds are made. Casts are made. Casts are sanded and holes are drilled. Parts are washed and assembled. Light detail painting and then clear coated.


All molds and casts are pressurized to 55 PSI. Casting requires a minimum of 30 PSI to be effective.
Homeworlds figures are heavier than printed figures the same size. My cast parts do not float in water. I use water to help check my parts. If a cast part floats, its garbage. It means it has an air bubble in it.
Series 1 and Series 2 figures have slight differences. Series 1 figures feature a matching glider pack.

Series 2 figures feature a missile pack in place of the glider pack. Glider Packs have been phased out and are no longer available.

All figures carry Homeworld's 90 Day Guarantee and Lifetime Warranty*
I know of no other Indy Toy maker in the world who offers this kind of guarantee.
Im committed to making the best figure I can. One that you will be proud to both own and display.
 |
| Series 1 |
All of Homeworld's figures are hand made. While I may have the Master 3D printed, Homeworld does not 3D print any of its parts. In fact, some of the masters needed were so small they could not be printed and had no choice but to be made by hand.
Molds are made. Casts are made. Casts are sanded and holes are drilled. Parts are washed and assembled. Light detail painting and then clear coated.


Homeworlds figures are heavier than printed figures the same size. My cast parts do not float in water. I use water to help check my parts. If a cast part floats, its garbage. It means it has an air bubble in it.
Series 1 and Series 2 figures have slight differences. Series 1 figures feature a matching glider pack.


Series 2 figures now feature clear urethane shoulder pins. A feature that will be permanent for all future figures.
All figures carry Homeworld's 90 Day Guarantee and Lifetime Warranty*
I know of no other Indy Toy maker in the world who offers this kind of guarantee.
Im committed to making the best figure I can. One that you will be proud to both own and display.
Sunday, July 30, 2017
WHAT DOES HOMEWORLD DO WITH EXTRA OR FAILED PARTS?
If they are tinted...I throw them out. Especially red parts. Red is the HARDEST color to match. I have 3 little part bins. ALL DIFFERENT SHADES OF RED or pink. Red mismatch tints show up more than the rest it seems. At least to me. You make a batch...one part...just ONE cast fails...its ALL garbage. I could try and match it up later...but that could take 3 or 4 or more attempts chasing a color for ONE part. Im better off throwing them all out and trying a complete pour all over. Im just wasting the mold among other things.
I have a whole tray of mismatched color parts...and the colors cant be matched up to other colors because the tints are specific. I could make a yellow and blue figure for instance, but the shade of blue doesn't look good with the particular shade of yellow.
I had thought of having a cast sale. 25 cents a part or something stupid crazy like that...but unless you have a rivet squeezer or all the other specific parts, my extra cast parts are no good to you.
So yeah...I have been throwing out the extra colored parts. Pure white, pure black and clear parts I do keep for later use because they always match up.
Sunday, July 23, 2017
PRICES-Stock VS Commission
In case some of you are wondering...stock prices are cheaper than commission.
By 'stock' price I mean what I have currently available. Its already made. You don't have to wait for me to make it.
Commission prices are more expensive because I make brand new molds for every commissioned figure.
Stock figures are limited to what I have available where as you can commission most anything you want.
Stock figures are usually available once a year. Commissions are available at any time.
Saturday, July 15, 2017
REPAIRING AIR BUBBLES
Myself, I would rather have one huge air bubble than a tiny one. A big air bubble can be easily fixed or altered for a custom project. Small holes mean a lot of work for little compensation. In most cases its probably easier to throw the cast away and simply make another. When dealing with tinted parts, its particularly problematic.
But "IF" you can manage to match the tint or are dealing with a standard color resin, the best way that I have found to fix a air bubble hole in a cast is to build up a small wall around the hole with clay. Then fill it up. You peel away the clay and a little bit of light sanding and Viola.
Of course, if the bubble is in an extremely sensitive or high detail area, it might be best to just make a new one.
If the bubble is in an unobstructed part of a mold channel, then cut out te bad area, reseat in mold and finish filling the mold. This method works great for making multiple color custom parts.
 Im going to peel away the clay and sand everything back down. The detail is simple so it wont even show when done.
 Here is a photo of a failed HEAD cast. I poured the resin in too fast. This created an air bubble that prevented the mold from filling all the way. Thinking it was full, I pressurized it. I cut out the bad part, re-inserted the cast back into the mold and poured in more resin to complete the fill. This can be done with exact color match resins. You wont even see a blend line unless you are using different colors like I did in the above picture.
But "IF" you can manage to match the tint or are dealing with a standard color resin, the best way that I have found to fix a air bubble hole in a cast is to build up a small wall around the hole with clay. Then fill it up. You peel away the clay and a little bit of light sanding and Viola.
Of course, if the bubble is in an extremely sensitive or high detail area, it might be best to just make a new one.
If the bubble is in an unobstructed part of a mold channel, then cut out te bad area, reseat in mold and finish filling the mold. This method works great for making multiple color custom parts.


Thursday, July 13, 2017
EXTENDING POT LIFE TIP...Resin & Silicone
Pot life (refresher) is the term given for the allowable time to manipulate your resin. It starts from the second you combine the 2 compounds. Pot Life varies from resin to resin. Please refer to your specific products for actual Pot Life times.
15 seconds is a long time when referring to Pot Life. And it still goes just as fast. So you need to be organized and efficient. No wasted movements.
One way to gain yourself a bit of extra Pot Life time...
Smooth On products, the way the instructions are read, you might think to add "A" to "B". But you don't have to. It doesn't matter if A gets poured into B or the other way around. And this can be applied to the silicone for making the molds as well.
POUR THE THINNER OF THE 2 COMPOUNDS INTO THE THICKER ONE. You waste time trying to get every drop from the thicker compound into the mix.
And no...it doesn't matter if you stir clockwise or counter clockwise. Just mix well. Always. That's where most of peoples problems happen. Insufficient mixing due to panick over pot life and pouring everything before the resin/silicone starts to cure. ever over extend yourself by trying to get too much done. One bumped mold can throw your timing right out the window.
Saturday, June 24, 2017
CUSTOM CLEAR MAGNOS FROM "THE CHEST ENGINE"
A friend of mine who runs the blog The Chest Engine recently commissioned a few Magno Heads from me and was having some custom fun with them.
I really like the Palisades Clear magno's. Too bad the plastic is so brittle. But for people like myself and a few others they are the most perfect magno for customizing because the color possibilities are endless if you have any customizing abilities. I myself kept 4 clear Palisades Clear/black BK sets for customizing a set in a particular color for myself. Clear with metallized blue accents.
UNFORTUNATELY...these were the last heads I am able to make. My molds have expired and I sold all my Emperors and King Atlas/Green Barons. So I don't have a master available to remake the mold. But if I had one, I could make more.
And here is what their owner over at The Chest Engine ( I really need to update my HOT LIST) did with them. Thanks to The Chest Engine for the pics.


 I love knowing I was able to help someone make customs like these.
AWESOME PICS and thanks again to The Chest Engine for the pics.
More information on the making of these figures can be found over at thechestengine.moranity.com
I really like the Palisades Clear magno's. Too bad the plastic is so brittle. But for people like myself and a few others they are the most perfect magno for customizing because the color possibilities are endless if you have any customizing abilities. I myself kept 4 clear Palisades Clear/black BK sets for customizing a set in a particular color for myself. Clear with metallized blue accents.
UNFORTUNATELY...these were the last heads I am able to make. My molds have expired and I sold all my Emperors and King Atlas/Green Barons. So I don't have a master available to remake the mold. But if I had one, I could make more.
And here is what their owner over at The Chest Engine ( I really need to update my HOT LIST) did with them. Thanks to The Chest Engine for the pics.


AWESOME PICS and thanks again to The Chest Engine for the pics.
More information on the making of these figures can be found over at thechestengine.moranity.com
Sunday, May 7, 2017
BILL MANTLO RECOGNIZED BY MARVEL
This has probably been dissected by Micronaut fans everywhere already, but in case some of you DONT KNOW...
Bill Mantlo was a writer for Marvel back in the 70's. In the 90's he was permanently disabled by a hit and run driver and his life changed negatively on every level.
Now...25 years later a resurgence of a past character now made popular by the Guardians of the Galaxy movies...Rocket Racoon means Bill can now live somewhat of a more comfortable life outside the hands of a government system which had him penniless and in government care which meant any gifts, memorabilia or assets of any kind had to be sold for his care.
Please click the link below for the compete story.
Im not ashamed to say I cried my eyes out over this. Bill's lost 25 years of his life. He will never get that back or his health. But now he can at least live in his own house and keep the things which mean something to him instead of being pushed around by the system.
http://www.hollywoodreporter.com/heat-vision/guardians-galaxy-how-rocket-raccoon-rescued-my-brother-bill-mantlo-999096
Saturday, April 15, 2017
In Memory of Joe (Joseph) Sikic
This post is in memory of a man none of you know. But to me, he was a great man. Joe Sikic.
He was my mentor. He took a confused high school drop out aimlessly bouncing from job to job and gave him a chance to determine his future. His direction in life.
A European, Croatian to be specific and a hard man. More than once he threw a part out of the shop during my learning process. I wasn't allowed to read the newspaper or a book or anything during coffee breaks. We didn't have cell phones then. "I'm paying for your coffee break. So you'll concentrate on work." He'd say. And I'd spend my coffee break writing down fractions in a 1/64th format up to one inch, calculate in my head the three decimal equivalent and then write it down and memorize it. During the day he'd shout out fractions and I had to know the decimal equivalent.
My parents weren't his biggest fans and more than once I had to tell my dad to stay out of it. It was a small jobber shop that earned me invaluable experience in the mid 80's when everyone else was out of work and only the most seasoned and experienced machinists were still working. Nobody wanted an apprentice. They all wanted machinists with 15-20 years experience. Not a former prep cook.
$6.00/hr Don't laugh. Its 1987. Considering my previous job as a cook was $5.50/hr...I was in heaven with the raise. I worked hard and laugh now at how he would teach me lessons. Things I still apply today. I always have the cleanest most organized work bench. For a reason. Things he taught me. Things they don't teach today. Tricks of the trade. Tricks I have since adapted and applied to the action figures I make.
I wanted to have lunch with him. To thank him. For all he did for me. Its been a few years since last we talked. I was in the corner store when I saw him. No...it wasn't him. It was him alright, but younger. It was his son. Upon talking to him I learned that Joe had passed away from cancer.
I feel bad that I never fully told him how much I appreciate everything he did for me. The opportunity he provided me and the skills he willing shared and taught me. He was a hard man with a soft center. A good man. I feel very fortunate to have known him and to have apprenticed under a man as skilled as he was.
I wish I could have told you in person.
Thank you Joe.
Friday, April 14, 2017
Cast Repair
There are a couple of ways you can repair a cast if you choose not to throw it out. And probably a couple more I know nothing about.
The first...Sometimes when pouring a sprue mold, you may accidentally over pour flooding the spout. This can produce an air bubble which may fool you into thinking the mold is full. Then when you open the mold, you find half a cast. These are fun for customizing. Now if you are lucky enough to be able to achieve a full seal by reinserting the cast back into the mold, then first simply cut out the part of the cast that failed put it back into the mold making sure it is 100% seated, and fill the rest of the mold. You can have fun by changing the color...or not. I've had success blending the same color together seamlessly in 2 or 3 pours.


If its a Smush mold, you can do the same as the above. Cut out the bad, reinsert cast into the mold, and add more resin. Sometimes that's not an option either. Sometimes where the cast fail happens, particularly in sprue molds, prevents simply cutting out the cast fail and adding more resin.
If its a high detail area, depending on the amount of resin used for the complete cast, I might suggest simply scrapping the piece and checking the mold for what could be causing the problem and try again. Sometimes its not worth it to save and fix. How much time are you willing to invest to save the failed cast? Is it worth it? Its not always.
If its in an area that can be worked back into form with a little sanding and ingenuity, then I would suggest taking some clay and building a little bowl around the hole which you would then fill with resin. The clay bowl keeps the resin from running all over the cast and ensures the failed area is fully filled. The bowl doesn't need to be very high. Simply tight to the cast and slightly higher than the cast surface. You can easily remove the clay after the resin has cured. What doesn't easily sands off. You then sand/rework the detail back. This method works well for flat, geometrical surfaces or areas where detail is easy to rework manually.
Those are the methods I use when I repair casts. Of course, you don't need to have a cast fail to have fun with the cast. You could intentionally under pour or pour discriminately to achieve results of a more specific nature.


Wednesday, April 5, 2017
ISO BEING SAVED!
Nothing like fan support to change peoples minds.
Mr Waugh, underestimated the value of his site to both collectors and the general public. Upon hearing how much people were upset, efforts have been taken to salvage and reactivate ISO. There may or may not be a domain name change, but ISO is in the process of being reactivated.
YEAH!!! GO TEAM MICRO!!!
Wednesday, March 29, 2017
DEATH OF A MICRONAUT
It is with GREAT sadness that I announce...THE DEATH OF A MICRONAUT.
I recently hit up my old Micronautapedia only to find it...offline. Then I received an email I had been expecting. The email I was expecting could have come from anyone. I certainly never expected the information devastation I was about to get.
ISO- Inner Space Online...is OFFLINE. Rumor mill has it Dave's interests no longer include maintaining ISO. Im gonna see if I can wiggle in and maybe help in some way to keep it up.
While we are ALL getting older and interests may be changing, we cant downplay our contributions to our hobby. WE have put in countless hours in support of it with thousands of hours of information. We probably didn't see it at the time. But now looking back...
Our efforts. Our time. To see it fade and all that information and history...lost...is a shame.
Saturday, March 11, 2017
Avengers Johansen Vs Olsen: Who's Hotter?
Due to the nature of this blog and the fact we're dealing with Marvel Characters, I feel this question is blog relevant. ;-)
 This might come as a surprise to some...But I would pick Elizabeth Olsen over Scarlet Johansen.
Scarlet seems to be losing her appeal. Not to say she isn't good looking. She's totally hot... but every movie she looks a little more weary. And by that I mean comparing her from the previous film to the next in the Marvel series of movies. Now with her short hair...she doesn't have that same level of sex appeal. IMO. Short hair is a look that's really hard for most women to pull off. She still looks fantastic in spandex. She's still a hot woman...but I would pick Elizabeth Olsen over her. When she pulls that pose to keep the tower from blocking Captain America's way at the airport in Civil War...oh man. She's just all out hot and she has awesome legs. The bustier doesn't hurt either.
I could be in the minority...but this is a battle I could debate all day.
Sunday, February 26, 2017
My Best Tools
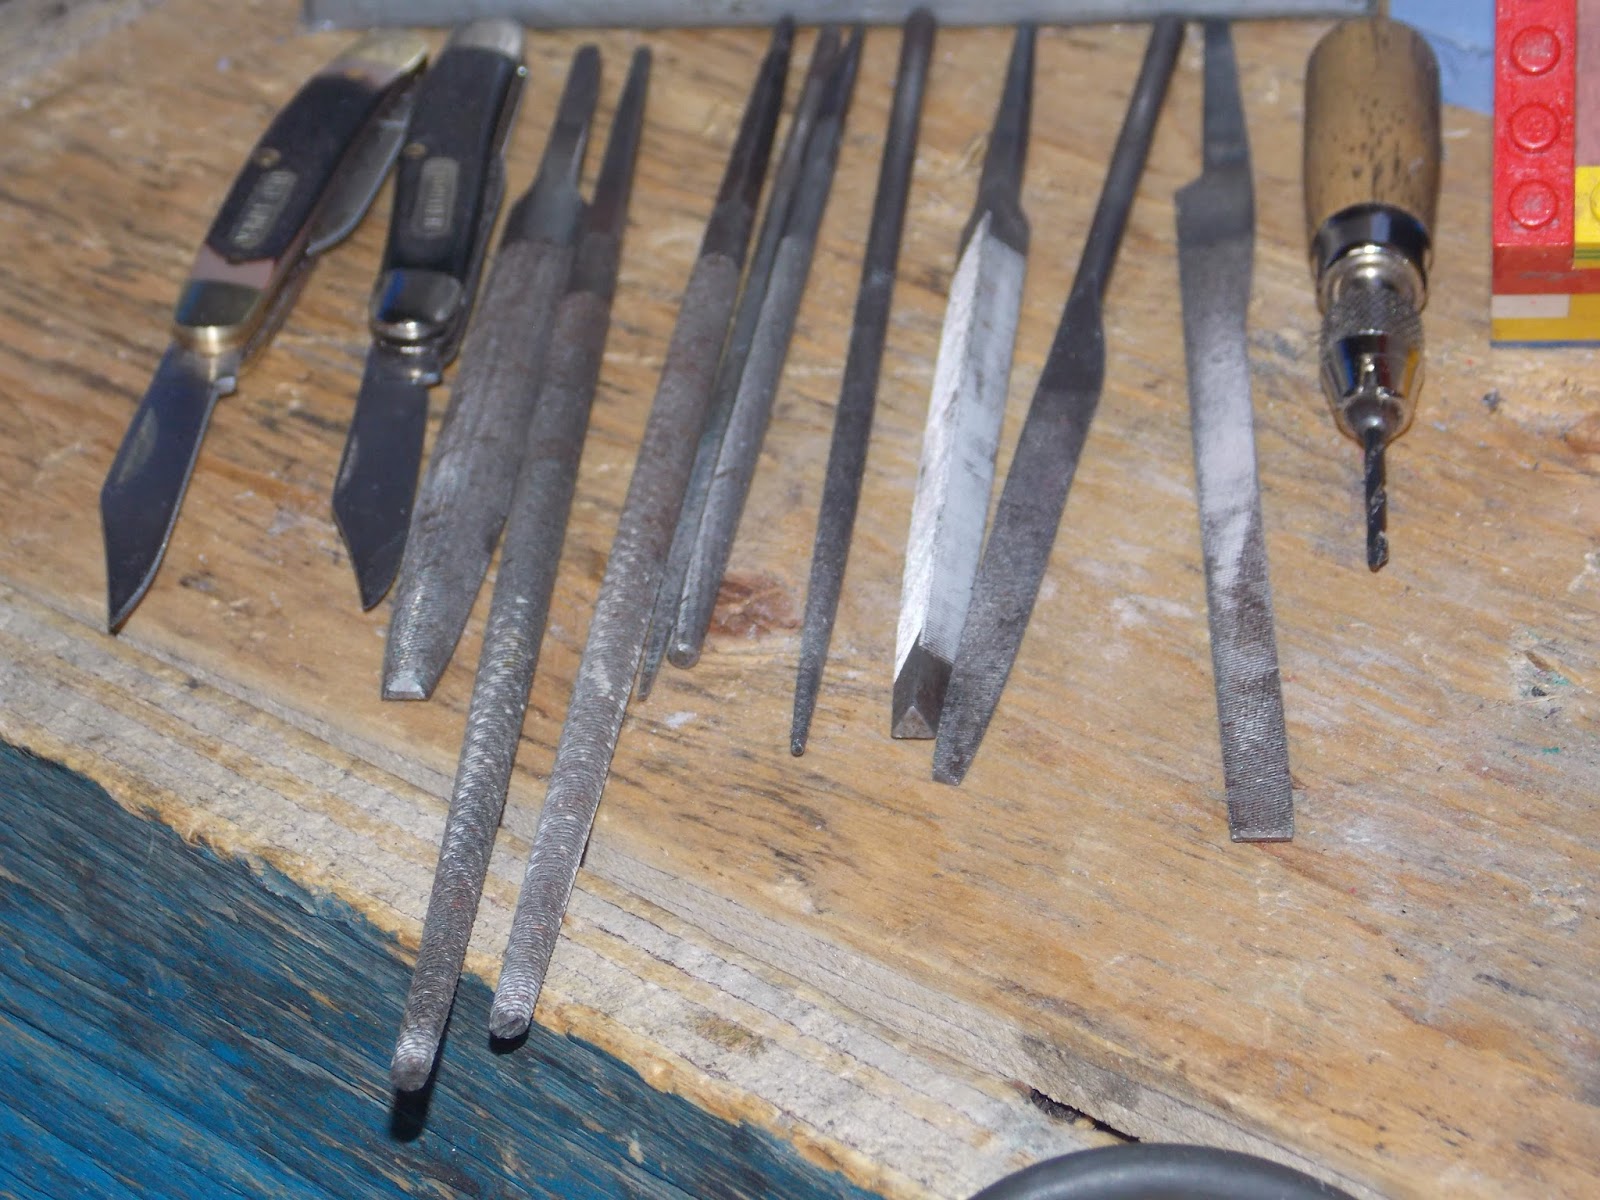
My best tools...are my files. I don't use sandpaper of any kind nor do I use Acetone. No chemicals of any kind are used in the finishing process except for whats in the clear coat.
Besides my pocket knifes, my files are my best friends. Sandpaper will crease where you bend it. the paper will crack and the grit will fall off where it is bent. So the edge of the paper really has zero effect.
As a machinist, I deal with metal. 1st year apprenticeship entailed making a static cannon on a base plate. All bevels were made with a file using a process called draw filing. the base plate had a 45 degree 1/8" wide bevel which was all done by hand. Files have hard edges so I can file right up to a corner and come in various shapes and sizes. Some I have modified for my own purposes.
So the use of files works perfectly for me. Plastic is no different than steel except its softer.
Here's my selection of files. This is everything I use to sand my products. When done, they re washed in a non abrasive mild sap and cold water with a well used steel scrubby. They are then riveted, painted where necessary and clear coated.

These files are round, square and flat for the various jobs required of them.
Besides my pocket knifes, my files are my best friends. Sandpaper will crease where you bend it. the paper will crack and the grit will fall off where it is bent. So the edge of the paper really has zero effect.
As a machinist, I deal with metal. 1st year apprenticeship entailed making a static cannon on a base plate. All bevels were made with a file using a process called draw filing. the base plate had a 45 degree 1/8" wide bevel which was all done by hand. Files have hard edges so I can file right up to a corner and come in various shapes and sizes. Some I have modified for my own purposes.
So the use of files works perfectly for me. Plastic is no different than steel except its softer.
Here's my selection of files. This is everything I use to sand my products. When done, they re washed in a non abrasive mild sap and cold water with a well used steel scrubby. They are then riveted, painted where necessary and clear coated.
These files are round, square and flat for the various jobs required of them.
Friday, February 17, 2017
ANOTHER REASON WHY UPS SUCKS
Another reason why I HATE UPS...
The companies that use them that I deal with are mostly in the US. Im not against customs fees. Im against INFLATED custom fees. $75.00 worth of rivets gets me a $37.00 custom charge. That includes brokerage fees which are not applied to packages delivered by USPS.
Another reason why I HATE UPS...they charge inflated fees but then don't accept cash. My wife has cash but they wont accept it. Who uses checks? And I have the cc's. So they then DONT deliver the package and I now have to re arrange my schedule to theirs to go down and pick up this package which I paid to have delivered to my bloody house.
If I don't pick it up in 3 days they automatically ship it back to its origin whereupon if the original shipper doesn't claim it within 3 days...it gets destroyed.
They don't care. If it gets damaged, their motto is...Its insured. If they believe it to be a hazardous item, they dispose of it. They recently threw out a heirloom painting hundreds of years old because the glass broke and never notified the sender or recipient.
They almost threw out a package worth hundreds on Bry.
The shipper at our company worked for UPS for 8 years and he will NEVER use them and is even less polite when talking about them than I am.
So please...Don't ship me anything via UPS. Their policies border insanity.
Friday, February 10, 2017
Smooth On Products
I just wish to state...
There are various companies around the world that make plastic resins. I use Smooth On products for various reasons The main ones are:
.
1...Their basic products are pretty much idiot proof.
2...They're a 5 minute drive away.
3...The end result is safe to play with.
4...They are environmentally safe.
5...They give me the results I expect and look for.
6...Educational information available for all products.
Of course more exotic resins might require more stringent safety precautions as with anything.
Sometimes things go pear shaped and it ''all becomes crap'' due to the frustration of both lost time and productivity.
Im not slagging Smooth On Silicone Rubber. It has advertised qualities that would be quite helpful for certain molds. If I could get the product to work. The frustration lies in not being able to figure out why this product is failing me. Im sure under the right circumstances Smooth Ons Silicone Rubber works very well.
Least I can figure...its either A) a reaction with the 205 release agent B) The mold cure time is out by at least 12-24 hours depending on the size of the mold or C) Its just a bad lot. Nothing else makes sense. Who knows. Maybe Im overlooking something very simple that I either did or didn't do. My ego can take it.
But because my results with this product have been mostly negative, Im not going to use the silicone rubber at this time for my projects. I will buy this product again with the sole purpose of trying to figure out why I couldn't get the results I should have gotten. I just don't have the time or patience to figure it out by doing product testing at just this particular time.
But believe me...when I do...I will be posting it.
Thursday, February 9, 2017
Silicone Rubber
I went to my Smooth On Dealer this morning and explained my repeated results.
He asked if the product came into contact with any clay. Apparently the elements in the clay would produce similar results. But the bed wasn't clay. It was an expired mold. The master was a thigh made from their Black Onyx resin. No problems there.
I brought the bottles back with me and he is going to check on the lot number. Maybe its a bad lot as the product itself was purchased less than 30 days ago. The only additive was the 205 release agent which should have posed no problems.
So I'll just have to wait and see what they say. They stand by the product. I stand by my results. So its most likely a bad lot.
Wednesday, February 8, 2017
SMOOTH ON SILICONE RUBBER...NOT RECOMENDED FOR MY PROJECTS
I...don't know why...I followed the instructions to the letter. I keep thinking its me. Yet I keep getting the same damn results.
I don't have anything bad to say about the Smooth On products I use regularly. But Smooth On Silicone Rubber is a bust for the molds I need! It says 45 min pot life and 6 hours to de mold.
After 12 hours...the silicone rubber is a stew of uncured molten mess. The outside is cured. But not the center. This is a theme with this crap. I have NEVER had a silicone Rubber mold made with Smooth On Products achieve anything even remotely close to a useable mold. I have tried and tried with this silicone rubber and nothing about it works. They all turn out a gluey, honey consistency mess.
Please understand. This is not a one off try. This isn't the first time I have tried to make a mold with this product. I have tried this product 4 or 5 times now. All with the same end result. I did have one mold that I was able to try. But only after I washed all the goo off. Ad even then, the damage to the mold made it not worth the effort.
I wont be trying this again.
SMOOTH ON SILICONE RUBBER...GRADE = F
Homeworld DOES NOT endorse or recommend the use of this product for our purposes.
Tuesday, February 7, 2017
3 3/4" Figures...CHROMED???
I think...Im not 100% sure...YET...
But I might be able to chrome some of my figures. If that true...Im soon to be broke.
I'll keep you updated. But Im VERY excited with this news.
But I might be able to chrome some of my figures. If that true...Im soon to be broke.
I'll keep you updated. But Im VERY excited with this news.
Monday, February 6, 2017
55 PSI
Im sure there's a Sammy Hagar song in there somewhere.
55 PSI. If you haven't heard me say that number before, it's the PSI (pounds per square inch) I set my pressure pot to.
Why 55 psi when everyone else references 30-35 psi? There's lots of reasons.
If it doesn't cost you anything extra, then why only build to minimum code? Basically, it cant hurt.
If there is an air leak this helps to at least keep the psi up high enough to work the resin.
Those are my 2 reasons for using 55 psi as my setting for my casts. I also use 55 psi for the silicone molds. Before I set up my pressure pot, I would drop the silicone mold repeatedly on the counter top. I would run an exacto knife through the silicone. Anything I could think of to break up air bubble and get the silicone around the master and into hard to reach places. Some molds didn't turn out because the silicone couldn't reach the hard areas in time before they started curing.
Using the pressure pot helps push the silicone into those hard to get to places. Im surprised where it goes some days. lol. Now I don't know if I need to go to 55 PSI for the molds...but its been working well for me at that setting. Maybe Im going too far for nothing. Maybe the extra 15-20 psi is nothing but overkill. I don't know...
But it cant hurt. :-)
Sunday, February 5, 2017
How to Extend Shelf Life
Shelf Life...Not to be confused with Pot Life.
Shelf Life is the term given for the basic maximum time a product can sit on the shelf before its no longer any good. I also include "opened". Once you open it and expose it to air.
One way I extend the shelf life of the resins and silicones is to never wipe the bottles. Then when they dry, they act as a seal. This does of course make it difficult to open the bottle later, but nothing a pocket knife and a monkey wrench can fix.
The tighter the seal when you close your bottles, the longer they will last.
Thursday, February 2, 2017
Color Tinting...Clear VS Solid Colors
Its an art. Why?
Beyond the delicate amounts of color used, different resins react differently when color is introduced.
A Standard white resin requires a great amount of color. The color needs to overpower the white of the resin. If you don't add enough color, the white will bleach the color into what I can only describe as a pastel color.
Clear urethane resins only require a pin drop of color because the color is fighting nothing.
When working with solid colors, you need to make all parts from one pour to achieve exactly the same color throughout the resin.
Clear resins are different. Because light can pass through clear resins, smaller parts made from the same pour will appear lighter than larger parts because more light is able to pass through them. So you will end up with various shades of the same color with only like size parts being the same in color. You will need to have several pours, adjusting the amount of color used in each pour to match the shades up or the larger parts will be darker compared to the smaller parts and look out of place.
Tuesday, January 31, 2017
ICONIX Selling Peanuts & Strawberry Shortcake
Iconix is in a bad way. First Met life fires Snoopy as their official mascot...NOW...the entire peanuts line is for sale most likely to be bought by Chinese investors.
Also owned by Iconix and ALSO going up for sale...Strawberry Shortcake. They recently purchased the rights and were set to develop a new animated series based upon the original.
I guess that's on hold.
Also owned by Iconix and ALSO going up for sale...Strawberry Shortcake. They recently purchased the rights and were set to develop a new animated series based upon the original.
I guess that's on hold.
Saturday, January 28, 2017
3 3/4" Glider Packs Discontinued
Please note...Past figure accessories included a Glider Pack. Glider Packs have been discontinued in favor of the Missile Pack. The missile pack will be made available separately for those who purchased past figures once I get some made.
To those who purchased figures with a glider pack, should you accidentally break your glider pack, no replacement parts will be available. Instead you will be offered a Missile Pack as a replacement.
Also, "ALL" Roboid/Deimos figures made from this point on will no longer have the chest canopy screwed in. The screw has been eliminated and the canopy will be glued in. None of the Deimos figures have the canopy screwed in which saved me a lot of work and allowed me to significantly drop the price of Deimos.
Monday, January 9, 2017
MOLD SPLIT
The fun with silicone molds is we can put the mold split line wherever we want. We can encase the entire master, just so long as its easy to remove from the mold with the closest replication and least amount of sanding and least amount of detail affected. Silicone provides the flexibility to stretch the mold slightly for cast removal.
I try to avoid running a mold split down a 5mm peg. If at all possible, I prefer to encase it and run the mold split down an area that's easily sanded with the least amount of detail. Like a corner or edge.
Here's an example of both.

Here, the peg is fully encased currently in clay, which when removed will be replaced with silicone. Also the mold split line goes through the top of the head where there is no detail and down the middle of his face again where there is little to no detail and a natural ridge dividing the face in half and then along the neck edge to the back side where the mold split is moved to follow the natural edges between detail to avoid as little disruption to detail as possible when sanding.
Monday, January 2, 2017
GOLDDOBER With BIGMAN TOYS Present: JADE
Its so cool. No stress. And because of that, Im coming up with simple answers to problems that were bothering me. Simple answers that cut valuable wear and tear off of my fingers. And cut time off of assembly. But more importantly its the "type" of work it cut out. A painful long drawn out process that resulted in blistered fingers, frustration and festered a lack of desire to make these.
In the last week, I have made 3 Deimos figures and Jade. They all need a final wash, some detail painting and some clear coat. I have dishes of clear urethane parts. Hopefully this is a new found desire that will last and not some simple surge.
But hey...its fun again. So I might as well blast out as many figures as I can while I have this energy. Next week I'll make Ronin. A 3 3/4" King Atlas.
Here's Jade. Sorry...taking pictures has always been a chore for me. Someday I'll get the hang of it.
Lee is an accomplished artist and self taught in 3D modelling. He did a wonderful job modeling the head for this figure. I was quite happy when he agreed to help me out.


There will not be any fancy artwork when these do become available. That's another headache unto itself. I wont be carding figures anymore. Except Marauder. "WHEN" I eventually get him done, he will be carded. But until then, we're keeping things simple.
In the last week, I have made 3 Deimos figures and Jade. They all need a final wash, some detail painting and some clear coat. I have dishes of clear urethane parts. Hopefully this is a new found desire that will last and not some simple surge.
But hey...its fun again. So I might as well blast out as many figures as I can while I have this energy. Next week I'll make Ronin. A 3 3/4" King Atlas.
Here's Jade. Sorry...taking pictures has always been a chore for me. Someday I'll get the hang of it.
Lee is an accomplished artist and self taught in 3D modelling. He did a wonderful job modeling the head for this figure. I was quite happy when he agreed to help me out.


Jade is not currently
for sale. Im not scrambling to have a pre order or rush to make a bunch. Im making a whole bunch of figures. Jade and Ronin and a few other variants of figures. Some clear urethane figures. Whatever grabs me. When I get a bunch made...probably this summer...I'll put a bunch up for sale.There will not be any fancy artwork when these do become available. That's another headache unto itself. I wont be carding figures anymore. Except Marauder. "WHEN" I eventually get him done, he will be carded. But until then, we're keeping things simple.
Subscribe to:
Posts (Atom)