I have rearranged my Micronaut shelf. Other than a few Interchangeables and my Magnos, this is pretty much all I have kept for Micronauts figures besides my customs. Whatever isnt in this picture is for sale.
But my SHARKOS has arrived. For years( DONT LAUGH TOO HARD) I was under the impression that the Sharkos had a die cast body. I thought...what a useless toy. To give it an aquatic theme and then put a die cast body on it is a disaster. I never asked. People's opinions on it varied. Some liked it, others didnt.
Recently I put a shit n giggles bid on a Sharkos on Ebay. Only because
it was 100% complete with box inserts as well. I fully expected to get
outbid. But I didnt. So now I own a Sharkos. After buying one, I have
a little more respect for the toy and am a bit choked at myself for not
researching this vehicle. Had I, I most likely would have bought this
vehicle years ago.
I am trying like heck to get caught up on alot of posting I havent been doing so this picture of the new shelf will have to do for now. I'll dissect the Sharkos more in a future post.
Saturday, March 23, 2013
Thursday, January 31, 2013
How To Tighten Rivets At Home
You dont buy a tool unless you plan to use it. Or unless you are like me and simply buy tools because you never know when you'll need it. I have tools I have only used once in 10 or 20 years even. But the moment I get rid of the tool...I'll need it.
For me a Hand Squeeze Riveter was a no brainer. For some people its an unjustified expense. And its not cheap. So I set to finding the easiest and cheapest way for everyone to save tighten their figures. I tried several methods. Made different tools and it doesnt get any easier/cheaper than this.
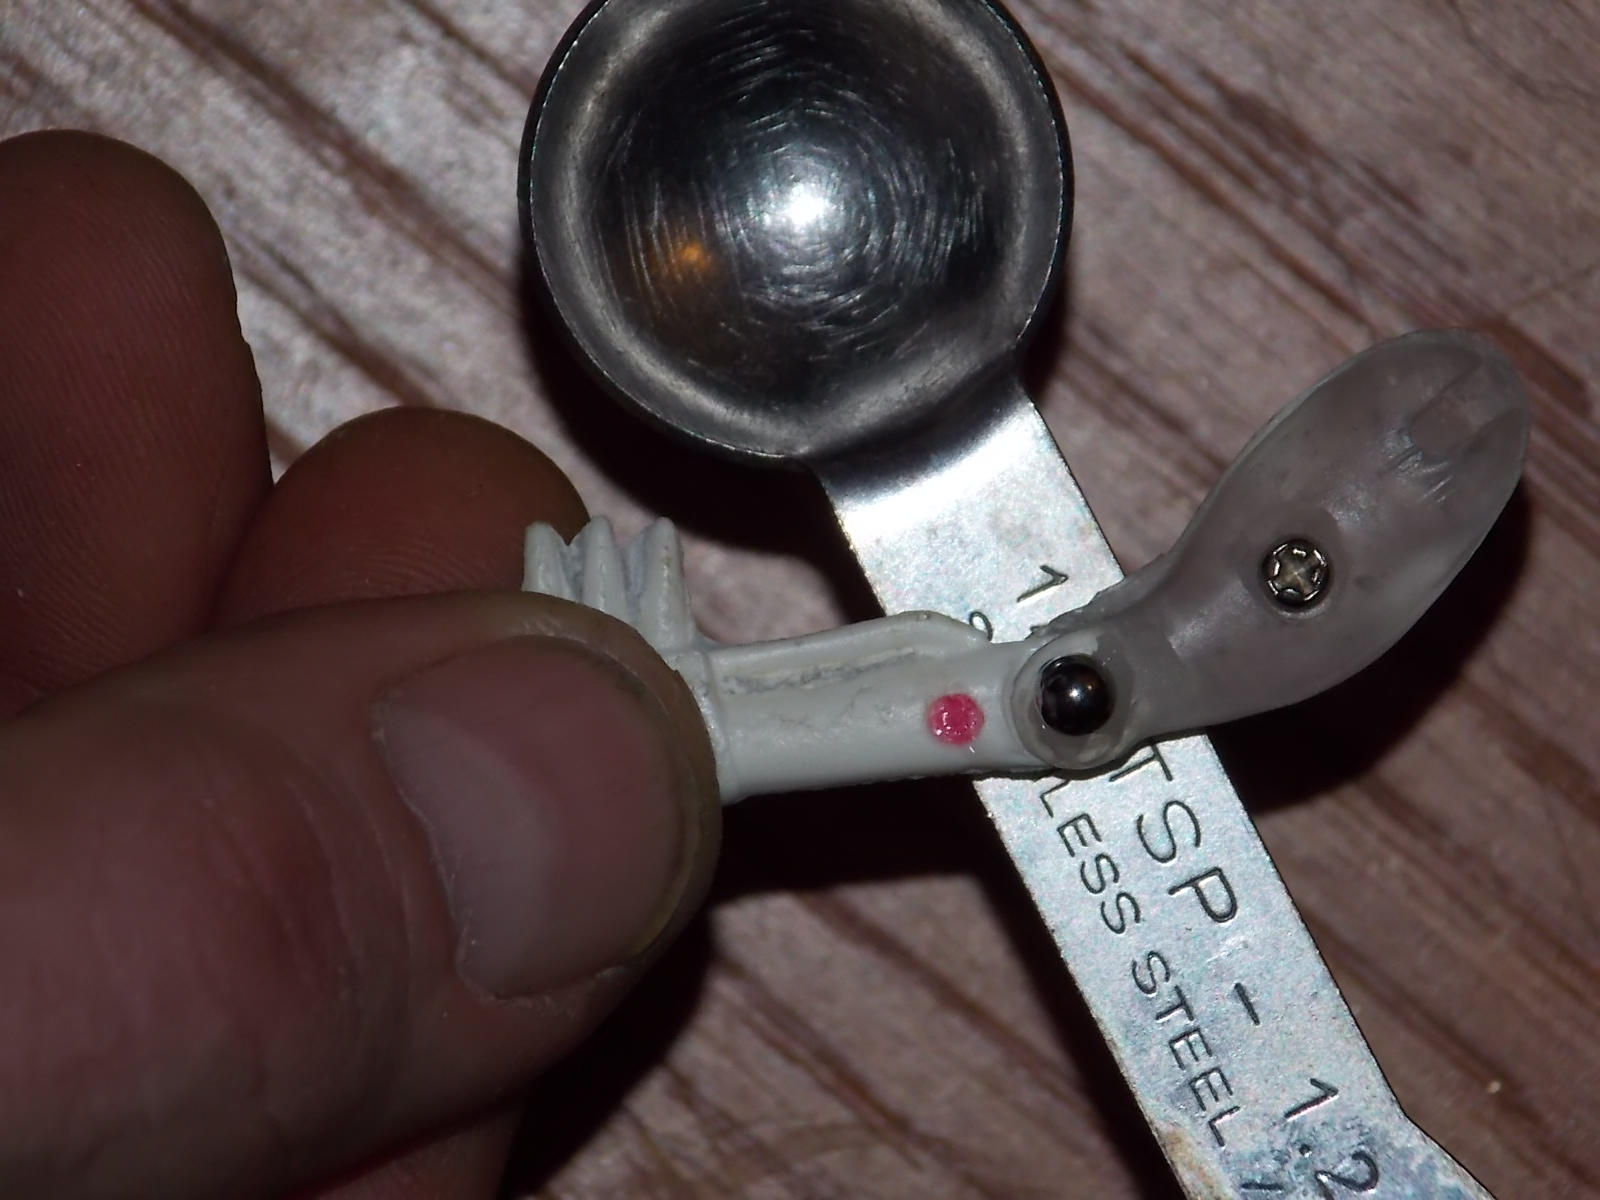
Tools: 1 small Ball Bearing. A standard BB will do.
A small flat piece of steel. A butter knife/table knife/steak knife
Butter/grease/honey or something similar.
I medium set of Pliers
1 vise
Directions: Put a dab of butter/grease or whatever you use in the CRUSHED end of the rivet. Place the ball bearing on the crushed end of the rivet and lightly press down to seat the bearing on the rivet. The butter helps keep the ball bearing from falling out.
Place you knife of choice or any other thin flat piece of metal you have in the vise. I used my measuring spoon. Place the limb you wish to rivet, with the head of the rivet upon the flat surface of your knife blade. The ball bearing should be on top. The vise is used to hold the steel to free up your hands and make it less awkward. More talented people might be able to get away without one. I have a vise. So I use it.
Using Pliers gently squeeze ball bearing and bottom of the flat piece of steel of your choice. Squeeze. Just a little. Dont overdo it. You need to get the feel of how much pressure you need to apply. Just squeeze a little bit and then check the movement. If its not enough, you can always squeeze it again. If you over squeeze you cant loosen the rivet. You would have to drill out the rivet and start over. The flat steel protects the head of the rivet from getting marked up by the pliers and the ball bearing does the same on the crushed side as well as it provides even pressure on the rivet.
Test Tightness. Repeat if necessary. Wipe of the butter and play. :-)
For me a Hand Squeeze Riveter was a no brainer. For some people its an unjustified expense. And its not cheap. So I set to finding the easiest and cheapest way for everyone to save tighten their figures. I tried several methods. Made different tools and it doesnt get any easier/cheaper than this.
Tools: 1 small Ball Bearing. A standard BB will do.
A small flat piece of steel. A butter knife/table knife/steak knife
Butter/grease/honey or something similar.
I medium set of Pliers
1 vise
Directions: Put a dab of butter/grease or whatever you use in the CRUSHED end of the rivet. Place the ball bearing on the crushed end of the rivet and lightly press down to seat the bearing on the rivet. The butter helps keep the ball bearing from falling out.
Place you knife of choice or any other thin flat piece of metal you have in the vise. I used my measuring spoon. Place the limb you wish to rivet, with the head of the rivet upon the flat surface of your knife blade. The ball bearing should be on top. The vise is used to hold the steel to free up your hands and make it less awkward. More talented people might be able to get away without one. I have a vise. So I use it.
Using Pliers gently squeeze ball bearing and bottom of the flat piece of steel of your choice. Squeeze. Just a little. Dont overdo it. You need to get the feel of how much pressure you need to apply. Just squeeze a little bit and then check the movement. If its not enough, you can always squeeze it again. If you over squeeze you cant loosen the rivet. You would have to drill out the rivet and start over. The flat steel protects the head of the rivet from getting marked up by the pliers and the ball bearing does the same on the crushed side as well as it provides even pressure on the rivet.
Test Tightness. Repeat if necessary. Wipe of the butter and play. :-)
Riveting Knee Joints on 3 3/4" Micronauts
I use rivets. I like them. They strength the figure. Plastic pins wear and/or break. Have a floppy leg Antron? Or a Repto? Thank goodness for the tail. You can either find a parts lot and replace the parts and hope the ones you get are tighter or will be tighter when you put everything together. Or you can drill them out and install rivets. It Can be done but its a last resort.
After 35 years the plastic is brittle and even manually drilling with my fingers spinning the drill bit...There is no rhyme or reason. It either works or it shatters. Once the hole is drilled, putting a rivet in isnt a problem. But the drilling is.
As a last resort if you have some spare legs to work with its actually worth it to try. It strengthens the figure like you wouldnt believe. I have a vintage Centaurus I did it to. I shattered 2 or 3 legs trying to drill it, but once it was drilled, she went together pretty good and is nice and firm. And since we are all accustomed to rivets in the arms/shoulders of our Microman figures, you actually dont even notice the rivets are there.
And considering how rigid this figure is now, I would rather have the rivets than not.
For those IN CANADA considering a Squeeze Riveter I...I cant believe I am saying this...Check Ebay first.
I went to several tool outlets and was informed at every one it would be 2-3 weeks for them to order it and the bill would have been between $250-$350. They had to order it. Order it? From where? From the US. Well shit I can do that myself. So I found a decent squeeze riveter for around $90 or $100 on ebay and after shipping/customs I saved at least $100.
Im not sure what US tool suppliers would charge, so for US residents you might want to check with a supplier first before hitting Ebay.
After 35 years the plastic is brittle and even manually drilling with my fingers spinning the drill bit...There is no rhyme or reason. It either works or it shatters. Once the hole is drilled, putting a rivet in isnt a problem. But the drilling is.
As a last resort if you have some spare legs to work with its actually worth it to try. It strengthens the figure like you wouldnt believe. I have a vintage Centaurus I did it to. I shattered 2 or 3 legs trying to drill it, but once it was drilled, she went together pretty good and is nice and firm. And since we are all accustomed to rivets in the arms/shoulders of our Microman figures, you actually dont even notice the rivets are there.
And considering how rigid this figure is now, I would rather have the rivets than not.
For those IN CANADA considering a Squeeze Riveter I...I cant believe I am saying this...Check Ebay first.
I went to several tool outlets and was informed at every one it would be 2-3 weeks for them to order it and the bill would have been between $250-$350. They had to order it. Order it? From where? From the US. Well shit I can do that myself. So I found a decent squeeze riveter for around $90 or $100 on ebay and after shipping/customs I saved at least $100.
Im not sure what US tool suppliers would charge, so for US residents you might want to check with a supplier first before hitting Ebay.
Saturday, January 19, 2013
Assemble Borg Bike
While I am a stickler for detail, when it comes to fines details like names and stats, Im not your guy. Some times I can remember them, most times not. away, and while I am nursing a sore thumb and a gashed finger I thought since I cant work on figures right now I could at least put up some new pics.
Here's an Assemble Borg Bike I recently picked up. I would hate to get anything more complicated as this is quite the thing to put together if you arent used to doing such things.
But I did find that the Microman Magne Force Figures fit it quite nicely. And the color matches this guy too, so the Magneto Mobile is now in need of a driver.
Acroyear Metis just got a new ride.
Here's an Assemble Borg Bike I recently picked up. I would hate to get anything more complicated as this is quite the thing to put together if you arent used to doing such things.
Acroyear Metis just got a new ride.
Sunday, December 9, 2012
Big Man Toys
Just a Heads up to everyone that there are some VERY VERY cool and interesting things going on over at Big Man Toys . New drops, Mini Figs...and EXCLUSIVE to Big Man Toys...TREEGAR!!!
Does this guy EVER sleep?!?!?
Monday, November 12, 2012
Framed Micronaut Aliens
I have been meaning to do this for the last few weeks. Yesterday, I finally did. I stopper by Wal Mart and picked up a frameless 20 X 30 Poster Frame. Its a sheet of acrylic that uses snaps to lock it in place. Smaller versions use a glass sheet. I use them for everything. They are very cheap.
So I flipped the cover sheet over and made a template. Then I cut out shapes that were roughly the same shape as the bubbles on the Micronaut Alien cards. I put the Carded Aliens over the template, put the freshly cut acrylic sheet over and now they are ready to hang. The cut outs also help to keep the cards from moving.
Wednesday, August 29, 2012
Sultan
You have heard me mention it. Its no big secret. The next Homeworld Blog Exclusive is Sultan. Sultan is a 3 3/4" remake of Baron Karza similar Flight Commander. Once again I have enlisted the help of Micronaut Guru and CGG artist MicroBry. (Que eerie Halloween music) Bry is once again doing the labels for Sultan which will be packaged similarily to Flight Commander.
Fortunately, I have been kind of fortunate naming figures. Flight Commander, Roboid, my (hopefully) next figure 'Marauder'. I havent stepped on any toes with those names and they just came to me. For the BK, I was lost. And you have to follow an unwritten rule of protocol. I cant turn around and reduce him to a mere captain.
I work with a man. I think we all do. You know the guy. From 40 feet he looks like Homer Simpson. He hates it when I say that, But its true. He is also a great friend and a very imaginative and ingenious individual. Funny, Funny man. Rodney. I bounce alot of ideas off of him. Anyway, we sat down for our coffee break and he lets me ramble on about my toys. One thing leads to the next and I tell him I am stumped on a name and explain it to him. So he follows my train of thought and starts throwing out a few possibilities when he looks at me and simply says...''Sultan.''
It has an evil hiss around the edges. It commands respect and attention. Sultan it was.
Unfortunately Mr. Michael Jaecks only made the Flight Commander Head Sculpt. He didnt do a Mini BK. So Bry is working on that as we speak. I called and my resins are in. So I can resume pumping out parts this weekend which also just happens to be a long weekend here. So hopefully I can have everything but the heads at least made. I would like to have them ready before Christmas and then relax and make a few variants for myself.
Sultan is going to be limited to a run of 25 just like Flight Commander.
I am looking forward to the next set of figures after Sultan. You are all in for a nice surprise at the very least.
Fortunately, I have been kind of fortunate naming figures. Flight Commander, Roboid, my (hopefully) next figure 'Marauder'. I havent stepped on any toes with those names and they just came to me. For the BK, I was lost. And you have to follow an unwritten rule of protocol. I cant turn around and reduce him to a mere captain.
I work with a man. I think we all do. You know the guy. From 40 feet he looks like Homer Simpson. He hates it when I say that, But its true. He is also a great friend and a very imaginative and ingenious individual. Funny, Funny man. Rodney. I bounce alot of ideas off of him. Anyway, we sat down for our coffee break and he lets me ramble on about my toys. One thing leads to the next and I tell him I am stumped on a name and explain it to him. So he follows my train of thought and starts throwing out a few possibilities when he looks at me and simply says...''Sultan.''
It has an evil hiss around the edges. It commands respect and attention. Sultan it was.
Unfortunately Mr. Michael Jaecks only made the Flight Commander Head Sculpt. He didnt do a Mini BK. So Bry is working on that as we speak. I called and my resins are in. So I can resume pumping out parts this weekend which also just happens to be a long weekend here. So hopefully I can have everything but the heads at least made. I would like to have them ready before Christmas and then relax and make a few variants for myself.
Sultan is going to be limited to a run of 25 just like Flight Commander.
I am looking forward to the next set of figures after Sultan. You are all in for a nice surprise at the very least.
Saturday, May 5, 2012
Micronauts Lobstros Finally Replaced
Yes, it was me. I purchased the MIB Lobstros that was on ebay recently. Actually there were 2. But 1 is missing the antennae and box inserts.
I had a complete Lobstros years ago. Oddly enough the seller of it lived only 10 minutes from where I was living at the time. It was the MEGO version. Oddly enough when I sold it in 06, it only sold for $450.00 which really sucked since I paid $750 for it.
This will make 3 Lobstros vehicles I now own. However 2 are incomplete. But with 2 incomplete ones to play with, I wont have a need to display the one I just bought. I'll let you think about that last statement. Keep your eyes open.
There are 2 Micronaut vehicles(?) I have never had and never will own. I gave up being a completist a long time ago as I was never happy. So I only collect those things that do. These 2 vehicles just dont make any sense to me.
The first one...Ampzilla...if that doesnt say it all, how about the fact its an overpriced last minute piece together toy. It has the same hands. They couldnt even have been bothered to make opposing claws. And the second is the Sharkos. Meant for the water, but sinks like a rock. Also it doesnt stay upright. Looks cool enough, but it just isnt for me.
And yes...I stole these pics from the auction because I still need a camera. Altho... buying this doesnt help me get one any quicker.
I had a complete Lobstros years ago. Oddly enough the seller of it lived only 10 minutes from where I was living at the time. It was the MEGO version. Oddly enough when I sold it in 06, it only sold for $450.00 which really sucked since I paid $750 for it.
This will make 3 Lobstros vehicles I now own. However 2 are incomplete. But with 2 incomplete ones to play with, I wont have a need to display the one I just bought. I'll let you think about that last statement. Keep your eyes open.
There are 2 Micronaut vehicles(?) I have never had and never will own. I gave up being a completist a long time ago as I was never happy. So I only collect those things that do. These 2 vehicles just dont make any sense to me.
The first one...Ampzilla...if that doesnt say it all, how about the fact its an overpriced last minute piece together toy. It has the same hands. They couldnt even have been bothered to make opposing claws. And the second is the Sharkos. Meant for the water, but sinks like a rock. Also it doesnt stay upright. Looks cool enough, but it just isnt for me.
And yes...I stole these pics from the auction because I still need a camera. Altho... buying this doesnt help me get one any quicker.
Subscribe to:
Posts (Atom)